
A new macOS firmware usually comes with bug fixes, performance boost, and a bunch of new features. However, there are times when upgrading macOS can be painful as you might suffer from glitches and errors, which ruin your experience. If this is the case for you, then you can downgrade to a more stable version and wait for new patches from Apple.
However, rolling back from a new macOS is not straightforward as it takes multiple steps to get the job done. No worries, we are here to help. This guide includes the step-by-step guide on how to downgrade from Catalina to Mojave.
Known Issues with macOS Catalina

- Stuck in login loop after software update.
- Email app not working properly for email reading and sending.
- Apps are running very slowly on Catalina.
- Battery life drops quickly.
- Mouse or keyboard no longer works.
- Can not connect to external Bluetooth device.
- Finder crashed occasionally and become unresponsive.
- 32-bit apps can not run on Catalina.
Before we get started, keep in mind that downgrading macOS will erase all of your data stored on your newer operating system firmware, so we recommend you keep a backup of your Mac. There are several ways to backup your Mac, but we advise you go for a third-party storage service like Dropbox or iCloud Drive.
Assuming that you now have a backup of your Mac, let's proceed to downgrad from macOS Catalina to macOS Mojave.
Method 1: Downgrade from Catalina to Mojave via Reinstall
Currently, macOS installer is distributed via Mac app store. And this is a the default way to downgrade or upgrade macOS. If you managed to find macOS Mojave app in Mac App Store, then this is the most preferable way to downgrade from Catalina to Mojave.
Step 1: Open App Store on your Mac and type "Mojave" in search bar.
Step 2: The search result contains all apps related to Mojave and locate macOS Mojave app.
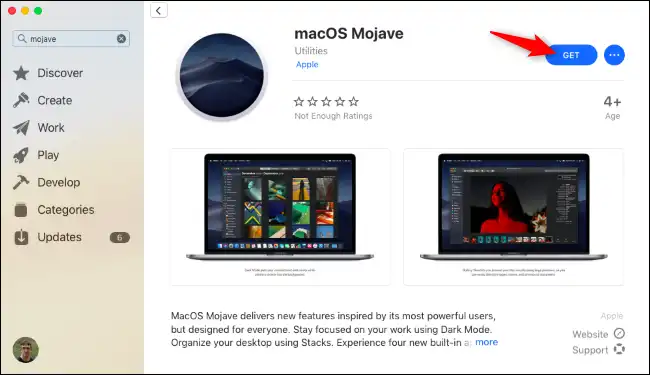
Step 3: Click the Get button to download macOS Mojave installation app on your Mac.
Step 4: When the download is finished, you will be prompted to install macOS Mojave if the current Mac hardware meets the Mojave hardware requirement.
Pros:
- Super easy and straightforward.
- Quite safe and no data loss.
Cons:
- macOS Mojave app not available on your Mac.
- Take more time to download Mojave app (over 8G) .
- Might encounter installation error on some Macs .
If you could not find macOS Mojave in Mac App Store or the hardware was not eligible for installation, then check the following methods instead.
Method 2: Downgrade from Catalina to Mojave Using Time Machine
Time Machine comes pre-installed on every Mac out there. Basically, it serves as a backup tool that allows you to create a complete backup of Mac, thus protecting your personal data from corruption or malware attacks. In this case, you can use Time Machine to downgrade from Catalina to Mojave and the process is pretty simple. Here is how.
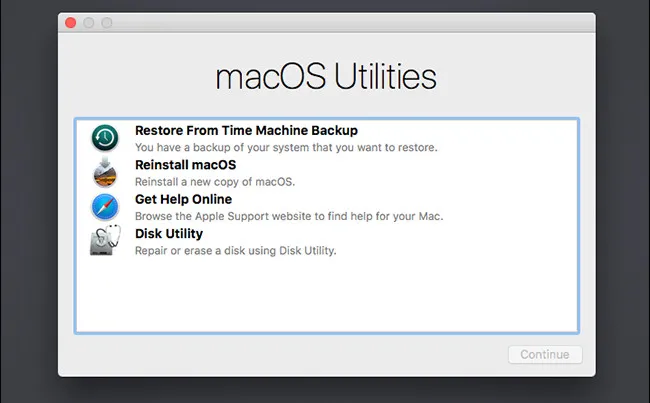
Step 1: First off, connect time-machine drive to your Mac and then restart your Mac while holding the Command+R keyboard combination. Let go of these buttons when you see Apple logo.
Step 2: Once macOSUtilities window shows up on the screen, select Restore from Time Machine Backup and hit Continue.
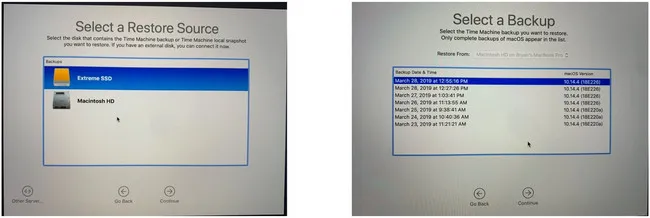
Step 3: From the Select Restore Source window, select your backup drive and then hit Continue. If your disk is password-protected, enter the correct password and then select the backup you wish to use. Look for the backup that has 10.14 under the macOS Version column.
Step 4: Hit Continue and then select your Mac's built-in drive from the list and then click Restore.
Step 5: Now, your Mac will restore from the backup (10.14) you selected earlier and macOS Mojave should be installed on your machine.
Pros:
- Totally free.
- No need to download other app.
Cons:
- Lose certain part of data after restore.
- Very slow and time consuming.
- A bit risky for messing up your Mac.
Method 3: Downgrade from Catalina to Mojave via USB Installer
If you don't have a Time Machine backup or your Mac did not ship with macOS Mojave when you first bought it, then you can roll back to a previous macOS using a bootable Mojave installer. The process involves creating a bootable installer from Mojave dmg file, so make sure you now have an external drive or a USB stick by your side.
Step 1: Download macOS Mojave DMG File
If macOS Mojave did not come pre-installed on your Mac, then you can download the installtion dmg file from the following linkh.
- Download Link 1: https://archive.org/download/macOS_Mojave.dmg
- Download link 2: https://sundryfiles.com/9tz
Step 2: Create Mojave Bootable USB Installer
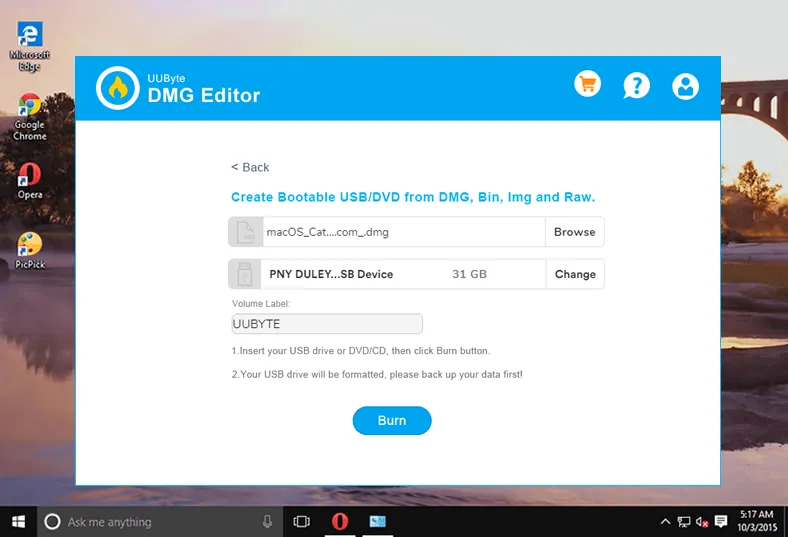
You can create a bootable installer using UUByte DMG Editor, a reliable tool that allows you to burn OS images to a USB drive or flash drive. To create a bootable installer of macOS Mojave with UUByte Editor, please download UUByte DMG Editor this official website and then go through the setup process.


Once you have reached the main user interface, click Burn and then select Browse to select the macOS Mojave image file you downloaded earlier to import it into the DMG Editor. Select your inserted USB drive or flash drive from the list and then hit the Burn button to burn Mojave dmg file to USB drive. Wait for the process to complete and eject your external drive from your computer.
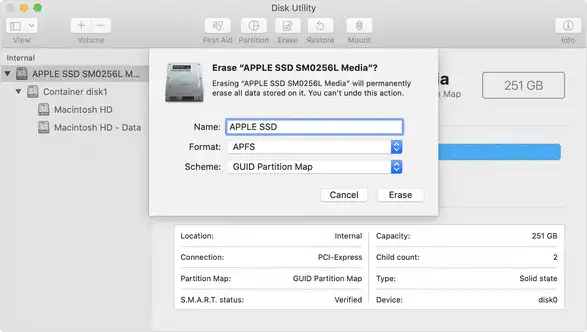
Step 3: Erase Catalina Partition
Hit Apple menu, then select Restart from the list. While your Mac is booting up, hold down the Command + R to enter Recovery mode. Select Disk Utilities from the macOS Utilities window. Select your startup disk and then hit Erase. Quit Disk Utilities once you are done.
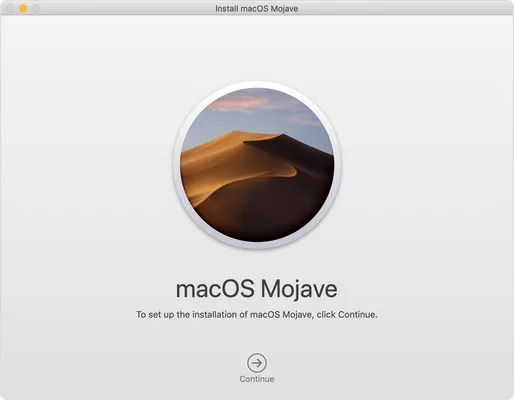
Step 4: Install macOS Mojave on Your Mac from USB
Insert Mojave bootable USB into your Mac and then restart Mac. macOS Mojave should start installing on your Mac. Once it is done, your machine will reboot and you should see the Setup Assistant. Just follow the on-screen instructions to set up macOS Mojave. When you are done, restore your settings and start transferring your files from Catalina to Mojave
Pros:
- Complete downgrade.
- Much faster than built-in Time Machine app.
- USB installer can be used for downgrading other Macs.
Cons:
- Need to download extra apps.
- Mojave dmg file is required.
- Erase internal drive and might result in data loss .
Summary
We proide three different solutions to help you downgrade from Catalina to Mojave. Each solution is designed for specific situation. Please check them carefully and pick up the best based on your own case. The first one is mostly recommended if it was available on your Mac. If not, then create a bootable USB installer with UUByte DMG Editor and use it to reinstall macOS Mojave.

Petty is editor in chief at UUByte and writes various topics about Windows and Mac to help people make the most of current technology.