
If your Mac is running macOS High Sierra (10.13), you may not be able to get new versions of certain apps to work. For instance, Lightroom and Photoshop's latest versions might not be compatible, which means you will need to upgrade to a higher version like macOS Mojave (10.14). This article shows you how to upgrade or do a clean install of macOS Mojave on a Mac currently running macOS High Sierra. Of course, this assumes that your Mac supports macOS Mojave.
If you're doing an upgrade, you can directly download and run Mojave installer app on your High Sierra system. The process is simpler than doing a clean install because you won't need an external USB drive for installation. The first method is explained below.
Warning: Not all Mac models are eligible for upgrading to macOS Mojave. Please check the hardware requirement first.
- MacBook Pro (Mid 2012 or newer)
- MacBook (Early 2015 or newer)
- MacBook Air (Mid 2012 or newer)
- Mac mini (Late 2012 or newer)
- iMac (Late 2012 or newer)
- iMac Pro (2017)
- Mac Pro (Late 2013)
Method 1: Direct Upgrade from macOS High Sierra to macOS Mojave
Since the first release of macOS, Mac users can directly upgrade to a new version via macOS installer app, which you can get from App Store. This is the official way to upgrade macOS from old version to a new version.
Step 1: The first step whenever you install a new OS version is to take a back up of your data, so you can do that now via Time Machine on an external drive.
Step 2: Go to Mac App Store and search for "Mojave"; alternatively, you can open this link provided by Apple. (It is recommended to use Safari browser if you're using the link.)
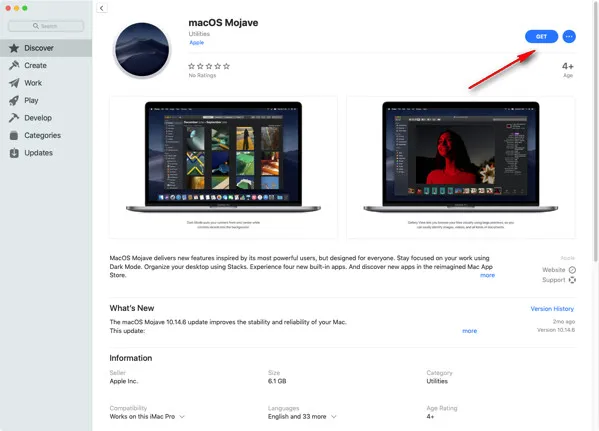
Step 3: Mojave installer app is pretty big and you have to wait some time to fully download it from Mac App Store.
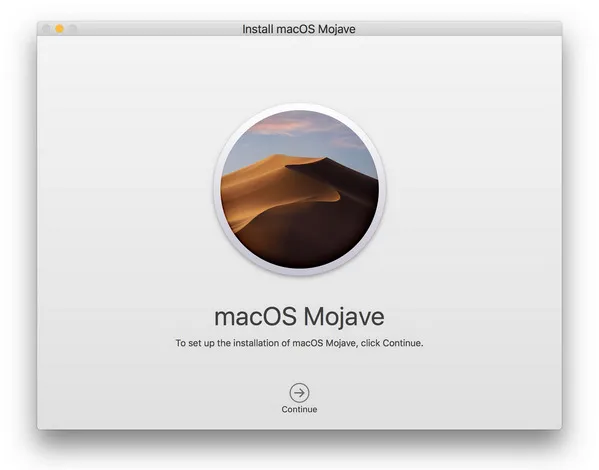
Step 4: When the download is finished, the app (called Install macOS Mojave) will be open automatically. Now, follow the instructions on your screen to complete the installation.
Pros:
- Simple enough and no extra step.
- Less error and no data loss.
- Completely free of charge.
Cons:
- Can not find macOS Mojave app in Mac App Store.
- May download a damaged copy of macOS Mojave app .
- Your Mac should be working normally.
This method is much easier so most people use this way to upgrade to a higher version of macOS once that is no longer the latest version. However, it is not always working as expected and you may see error like the following one:

If you can not get in your Mac or you prefer to do a clean install, then the direct upgrade is not suitable. You need to create a bootable macOS Mojave USB drive first and use it to install Mojave on your Mac. Hence, this is an indirect way to upgrade to Mojave from High Serria. We will share more details about this method in next section.
Method 2: Upgrade from High Serria to Mojave via Clean Install (Bootable USB)
A clean install ensures that your hard drive is wiped clean and formatted before installing a new version of macOS, which means your apps and data will all be gone. Sometimes, that's the desired result, especially when your Mac is running slowly because of heavy data and you want to refresh it along with the upgrade to the latest or at least a higher macOS version. If you need to do a backup, do that now using Time Machine and an external drive. You will also need an additional external drive for the installer.
Part 1: Create macOS Mojave Bootable USB in Easy Way
There are two different approaches to create macOS bootable USB. The simple way is via third-party apps, which usally involves less steps and has a GUI. The other way is by using a set of combined text commands in Terminal app. We will go with the easy one first.
Step 1: Get a copy of macOS Mojave DMG file.
- Download Link 1: https://archive.org/download/macOS_Mojave.dmg
- Download link 2: https://sundryfiles.com/9tz
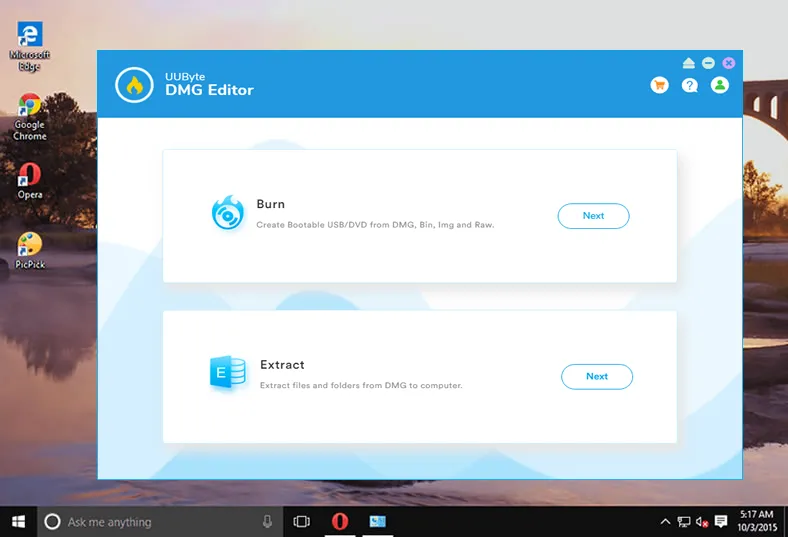
Step 2: Plug in an USB drive to your computer (PC or Mac) and install UUByte DMG Editor on it.


Step 3: Open UUByte DMG Editor software and click the 'Next' icon at the right side of Burn menu. At this time, you will be redirected to a new window.
Step 4: Click the 'Browse' button to locate the macOS Mojave DMG file you downloaded previously. And choose the right USB drive in second column.
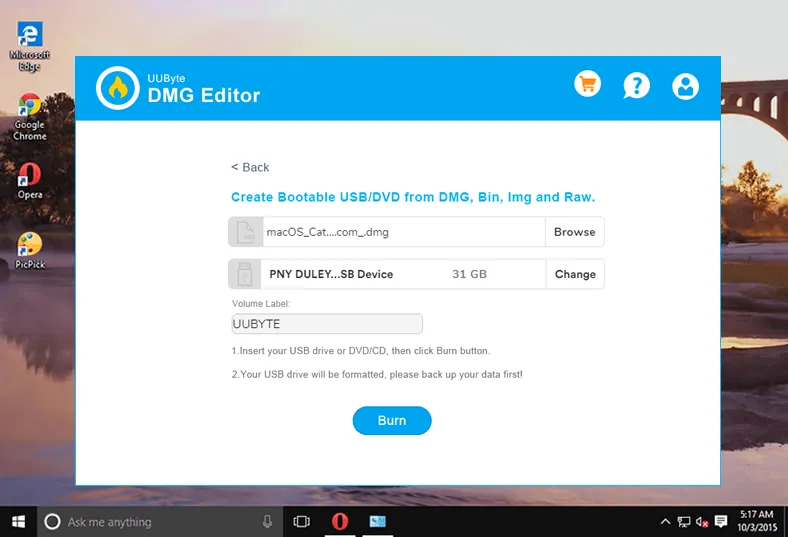
Step 5: When the above steps are completed, hit the 'Burn' button at bottom to start creating macOS Mojave USB installer from DMG file. Wait about 5-10 minutes.
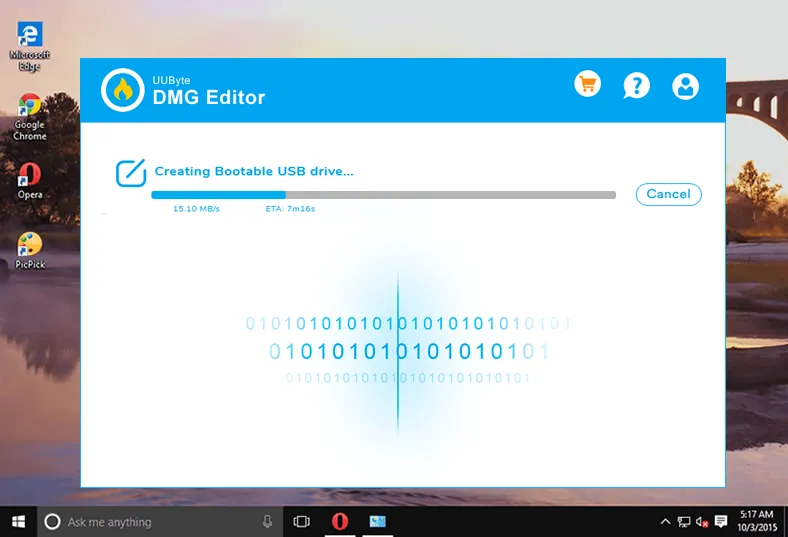
You will see a success message at the end of process and this means a bootable USB installer is ready! You can now use it to install macOS Mojave on your Mac and start the upgrade process.
Bonus: Create Bootable Mojave USB Installer on Mac via Commands
You can create any macOS bootable USB installer on a PC or Mac with UUByte DMG Editor but text command is only available on Mac. This means you should get a working Mac in order to apply this trick.
First, download macOS Mojave app from App Store. Quit the app when it is launched after download. Now, open Terminal and type in 'sudo' (without quotes) and a space, and leave it like that. Now, go to Finder and right-click on the installer file to select Show Package Contents.
Open Terminal and type in 'sudo' (without quotes) and a space, and leave it like that. Now, go to Finder and right-click on the installer file to select Show Package Contents.
Locate the file called createmediainstaller inside the Resources subfolder in the main Contents folder. Keep your Terminal window visible and drag this file into Terminal. You'll see that a location has been added after your sudo command.
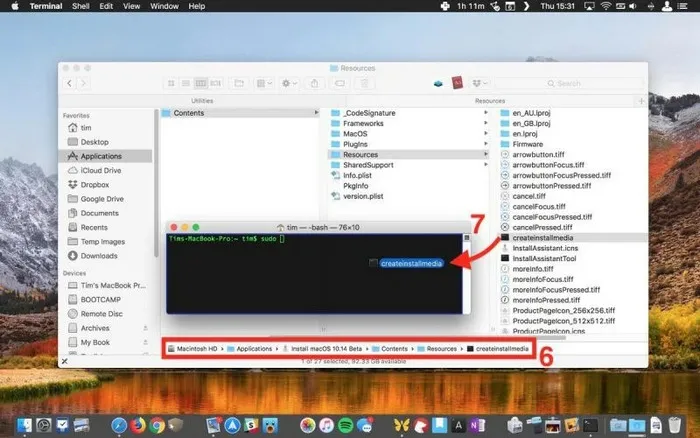
Type --volume and then a space, and leave it for now. Back in Finder, go to /Volumes using the Go → Go to Folder option. You can now connect your USB drive to your Mac. From Finder, drag your device's icon into Terminal again.
Hit Enter and then enter your password for the Mac when prompted to do so. When you see the prompt on Terminal asking you if you want to continue, type Y and hit Enter.
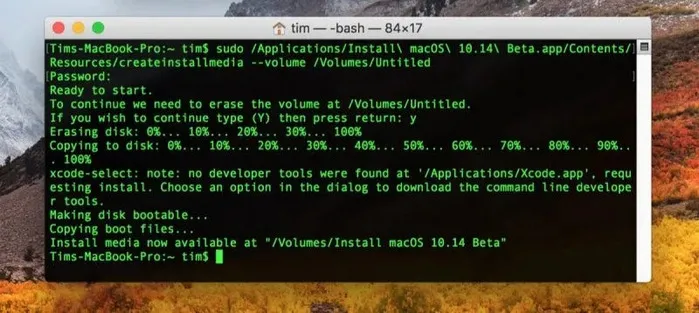
The USB installer will be created in a few moments. Now that you have the installer ready, you can proceed to the installation part.
Part 2: How to Install macOS Mojave on Mac from Bootable USB
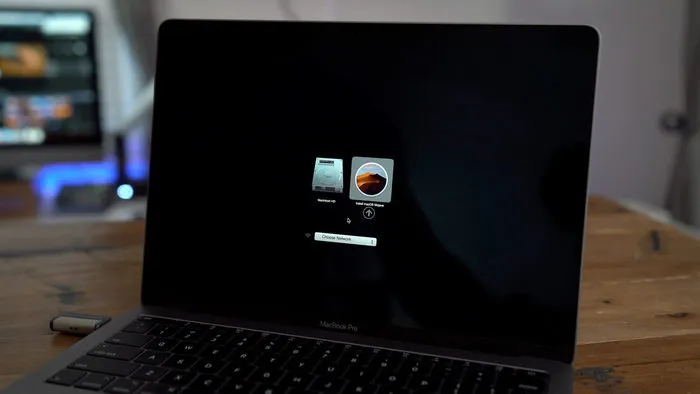
Step 1: Restart your Mac and hold the Option key down when you hear the startup chime.
Step 2: Select Install macOS Mojave in the list you see on your screen. You may need to use the arrow keys and the Enter button if you can't use the mouse.
Step 3: When the Utility window appears, select Disk Utility. Then, choose your main hard drive and click Erase.
Step 4: When the formatting is done, go back to the Utility window and choose Reinstall macOS. Follow the instructions on your screen to install macOS Mojave.

You have successfully done a clean install of macOS Mojave from a USB installer on a machine running macOS High Sierra. Be sure you follow all the instructions in this article, especially where the command line inputs in Terminal are concerned.
Pros:
- Universal applicable.
- Work on both PC and Mac.
- Can be used on multiple Macs once bootable USB being made.
- No need to download macOS install app when it is not available.
Cons:
- Has to install additional software or use text commands.
- Require an external USB drive.
- Installation may fail on unsupported Mac models.
Summary
In conclusion, you can upgrade from High Serria to Mojave in both direct and indirect way. It is up to you what kind of situation you are in. If you could find macOS Mojave app in Mac App Store, then it is recommended to finish the upgrade within the app. If not, then you can create a bootable macOS Mojave USB and use it to install macOS Mojave on your High Serria powered Mac.

Petty is editor in chief at UUByte and writes various topics about Windows and Mac to help people make the most of current technology.