
For system admins and Mac app developers, they usually need to install different versions of macOS on different Macs. Hence, they have to prepare for multiple USB drives (one macOS installer sits on one USB drive). This is really inconvenient! You have to keep and carry multiple USB drives at the same time.
Creating a multiple macOS bootable installer on a single USB allows you to install different macOS versions on different computers. You can even run them as VMs in Windows, which makes this a very versatile process. But what about the tools to get the job done. Can this be done on a Mac? Absolutely! That's what we're about to show you.
Advantages of Multiboot USB Installer for macOS
Having a USB installer for multiple versions of macOS can help you in many ways:
- You can choose a macOS version when clean-installing on an older Mac.
- You can switch versions on the same computer by re-installing a different version of macOS.
- You can have multiple macOS versions on VM in Windows using Parallels or a similar application.
- Quickly repair any version of macOS if you have multiple versions ready to use.
- Easy to carry around wherever you go.
The real advantage here is flexibility. You can use these macOS versions on any Mac or PC by spending just a few minutes for the installation process. Even running Mac on Windows is as simple as deploying VMs and putting multiple macOS versions on them. In short, if you want to run any macOS version on any computer, the multiboot macOS installer is a blessing in that sort of situation.
Requirements
Before actually creating the multiboot USB installer, you'll need to take care of a few preparatory tasks:
● Get a USB drive (USB 3.0, fast reading and writing speed) with at least 10 GB free space for each macOS version. The general practice is to always have a buffer of a few GB since OS sizes vary depending on the source. For instance, third-party sources may have added some bloatware that increases the size of the file.
● Download macOS Installation app or DMG files for the versions of macOS you intend to put on this drive. As mentioned above, you may have some bloatware in the installer packages. To avoid this, try to get it from Mac App Store or a reliable third-party repository.
● A working Mac computers with enough free space. You need to download macOS install app on Mac, Each macOS installation app takes a plenty of free storage. However, you can download dmg file from other websites and put them on external USB drive to avoid taking free storage on your Mac.
● Ensure that the USB is partitioned properly. If not, you'll need to do that before creating the installer. We'll show you how to do that. It's merely a question of checking whether partitioning is enabled and then setting it up for each of the macOS versions you want on the USB drive.
● Know how to use Disk Utility and Terminal on your Mac. Both of which are available by default. Make sure you're familiar with using these applications because they can impact your Mac at the system level.
How to Create a Multiboot macOS USB Installer on a Mac
If you're ready, let's get started.
Step 1: Partition USB Drive on Mac
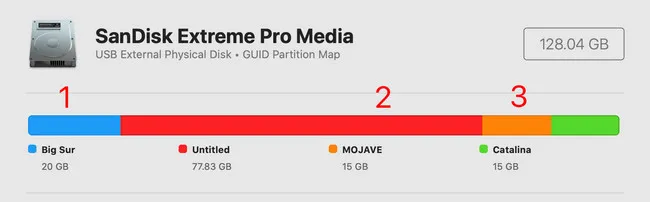
The first step is to create new partitions on external USB drive. It depends on how many macOS versions to be kept on that USB drive. In the following example, we will create 3 partitions for macOS Big Sur, Catalina and Mojave, which are the most popular macOS release up to now.
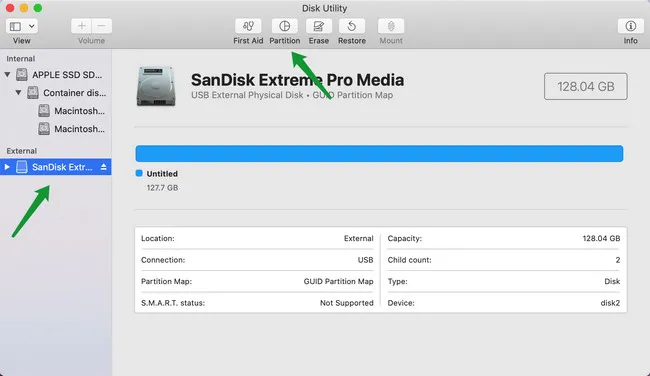
Insert USB drive on Mac and open Disk Utility app from Spotlight. Right click the USB drive name at left sidebar and you will see Partition tab is visiable. Click on it to create a new partition.
From the new settings page, please give a name to new partitoon and choose Mac OS Extended Journaled)in Format tab. Finally, set a size for new partition. For macOS Big Sur, please make it to at least 20GB. 15GB For other macOS versions.
Warning: APFS formatted disk can not be used as a bootable install media.
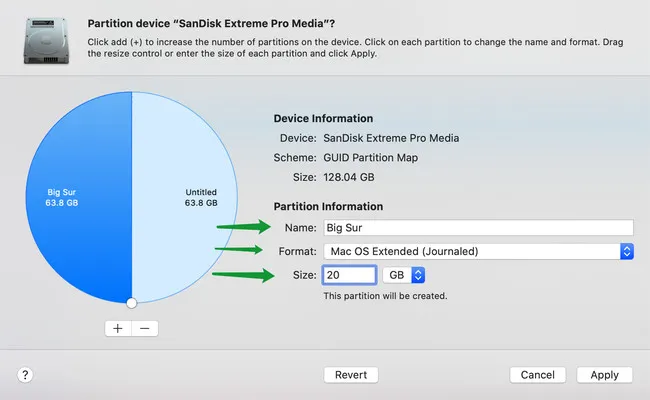
Back to Disk Utility, you can now click the Partition button. Clik the space in Untitled partition and the + button to add another partition. If you don't see the + symbol, change the Format field to Mac OS Extended Journaled). You can now adjust the space available for each macOS installation file.
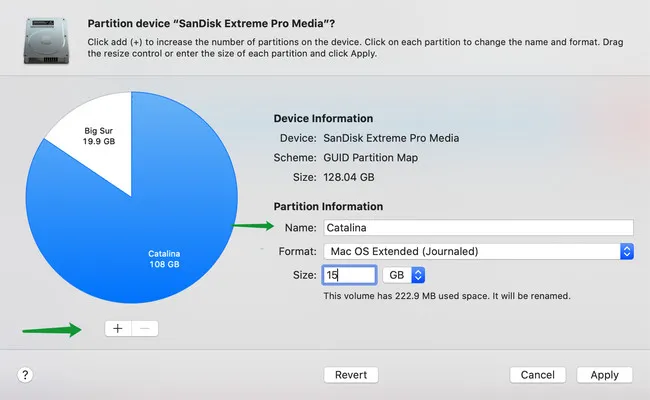
To add multiple partitions, repeat step 2 and hit Apply after creating each partition. For this example, we'll create three new partition for a total of four available partitions: one for macOS Big Sur, one for macOS Catalina and one for macOS Mojave.
Step 2: Get Unqiue Volume Name for Each Partition
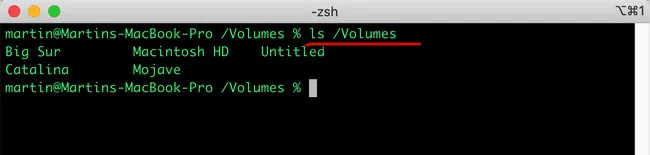
After completing the above step, the USB drive is divided into four different partitions. You have to get the unique identifier so you can write different macOS versions to a specific partition. Open Terminal app and run ls /Volumes command to display mounted volume name for each partition of that USB drive.
In the following example, the volume names are Big Sur, Catalina and Mojave . We will use this information in next step.
Step 3: Create macOS Bootable USB Installer
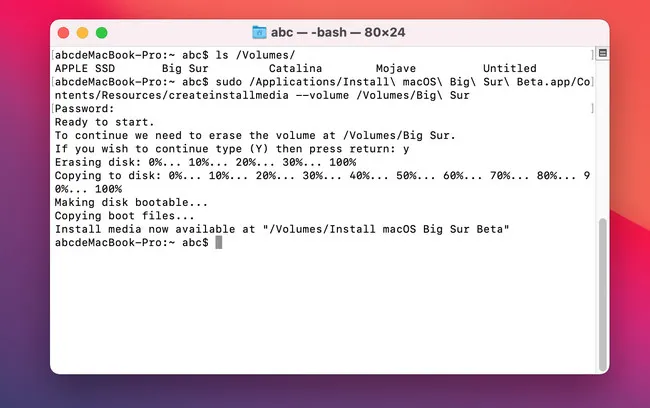
Back to Terminal window, run the following command to create macOS Big Sur USB installer. Make sure you already download macOS Big Sur Installer app from Mac App Store.
sudo /Applications/Install\ macOS\ Big\ Sur.app/Contents/Resources/createinstallmedia --volume /Volumes/Big\ Sur
Enter login password if prompted and confirm with a 'y' if asked to. Wait about 3-6 minutes and you will see a message, indicating install media is available for usage.
If you're only creating a single macOS installer, you can eject the drive at this point. However, since we're adding another macOS version to the USB, repeat the same steps to put macOS Catalina installer on the USB with this modified command.
sudo /Applications/Install\ macOS\ Catalina.app/Contents/Resources/createinstallmedia --volume /Volumes/Catalina
Once it is completed, repeat the process and start to create macOS Mojave USB installer with this similar command:
sudo /Applications/Install\ macOS\ Mojave.app/Contents/Resources/createinstallmedia --volume /Volumes/Mojave
Now a multiboot installer for macOS Big Sur, Catalina and Mojave is created successfullyon your Mac!
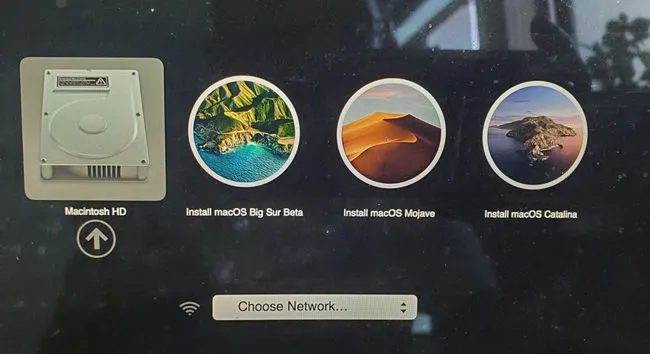
Step 4: Boot Mac from Multiboot USB Installer
Insert the multiboot USB installer into a target Mac. Power on the machine and keep pressing Option key to bring up Startup Boot Manager, where you can select a macOS instance to be installed on this Mac.
Summary
The most challenging part in this tutorial is to properly partition the USB drive. Also, you should download macOS installer app or dmg file before moving ahead. This will take a lot of time. And the rest part is quite simple and error free.

Petty is editor in chief at UUByte and writes various topics about Windows and Mac to help people make the most of current technology.