Table of Contents
When a new macOS come out, you will find a bunch of amazing new features. Taking macOS Ventura for example, the new UI design is very attractive to me. So I decide to install Ventura on an external drive instead of upgrading from Monterey on my Mac as this is more simple and risk free!
I will cover all the details in this post. Please stay tuned!
Warning: Please backup your Mac in case of unexpected error or wrong operations.
Benefits of Installing macOS on an External Drive
There are a number of benefits to installing macOS on an external drive. One of the most obvious benefits is that it allows you to keep the internal drive free for other purposes, such as storing personal files or installing apps.
Another benefit is that it can be a convenient way to create a backup of your entire system. If something goes wrong with your main drive, you can simply boot from the external drive and continue working as usual.
Finally, installing macOS on an external drive can also be a good way to try out the latest version of the operating system without affecting your main drive. This can be especially useful for beta testers or anyone who wants to experiment with the new features without risking their main system.
Can You Install Ventura on a USB Drive?
This is a frequently asked question because USB is cheap and easy to get.
Someone says yes but it is No from my own experience. It is totally possible to install an old version of macOS on a USB drive such as Big Sur or Catalina. But it is not the case for Ventura, the latest desktop operating system for Mac. Ventura has more strict driver requirements for installation. That’s why USB is failing.
I tried to install Ventura on a USB 3.0 flash drive (500GB) multiple times but none of them worked. First, my Mac says the installer was not verified. So I re-download the install app from Apple.
Secondly, I made a bootable USB drive but my Mac says the installer app was corrupted after waiting a few hours. This is ridiculous as the app was downloaded from Apple.
Lastly, I formatted the USB with APFS and made a network install in Recovery mode, hoping this could go fine as this is a solid method to reinstall macOS. At the end, it goes into reboot loop after the download is completed.
However, the process goes smoothly when I was trying to install Ventura on an external SSD.
Why Choosing External SSD over USB drive?
In short, USB drive is not a real hard drive. It is recognized as a portable device on Mac. The internal controller chip of USB is unable to handle requests made by macOS. What is more, macOS can be only installed on a disk with GUID Partition table. This is no problem for external SSD, except for the expensive price.
Portable SSDs are generally faster than USB flash drives, so your Mac will boot up faster and run more smoothly. Additionally, SSDs are more durable than USB drives and are less likely to be damaged if dropped or knocked around.
Another reason to choose an external SSD is that you can easily connect it to a Mac with a USB cable, and it doesn’t require any special adapters or software. You can simply plug it in and start using it right away. By contrast, a USB drive requires a special adapter in order to be used with an SSD, and you may also need to install special drivers or software in order to get it to work properly.
Finally, an external SSD is typically more expensive than a USB drive, but it is also much higher quality and will last longer. If you’re looking for the best possible performance and reliability, an external SSD is the way to go.
Best Portable SSD for Mac in 2022
There are a few things to consider when choosing the best portable SSD for Mac. Capacity is one of the most important factors, as you’ll want to make sure you have enough space to store all your important files. Speed is also important, as you’ll want to be able to access your files quickly and easily. Finally, compatibility is another key factor, as you’ll want to make sure the SSD is compatible with your Mac.
Here are a few of the best portable SSDs for Mac:
1. Samsung T7 Portable SSD
The Samsung T7 Portable SSD is a great option for Mac users. It offers fast speeds of up to 540 MB/s, and it has a capacity of up to 2 TB. It’s also compatible with both USB 3.0 and Thunderbolt 3.
Samsung’s Portable SSD T7 Shield is a great way to keep your data safe and secure while on the go. The T7 Shield features a built-in AES-256 encryption engine that keeps your data safe and secure, even if your device is lost or stolen. The T7 Shield also features a ruggedized casing that can withstand drops and bumps, making it ideal for use in harsh environments.
2. SanDisk Professional G-Drive Pro SSD
SanDisk is a well-known brand when it comes to flash memory and storage devices. The company offers a wide range of products for both consumers and businesses. Its Professional G-Drive Pro SSD is a high-performance solid state drive (SSD) designed for use in demanding applications such as video editing, graphic design, and gaming. The drive offers fast read and write speeds, as well as reliable data protection.
G-Drive Pro SSD features a durable aluminum casing that helps dissipate heat and protect your data. The drive is also shock and vibration resistant, making it ideal for use in mobile workstations. The drive comes with a USB 3.0 interface for fast data transfer, and is compatible with both Mac and Windows computers.
SanDisk G-Drive Pro SSD is available in capacities of up to 1TB. Prices start at $399.99 for the 500GB model.
3. LaCie Rugged SSD Pro
LaCie Rugged SSD Pro is a high-performance solid state drive (SSD) designed for professionals who need fast, reliable, and durable storage. It offers up to 1TB of storage capacity, fast data transfer speeds, and rugged durability. The drive is encased in a shock-resistant aluminum casing and is rated for IP54 dust and water resistance. It also features a USB 3.1 Type-C connector for compatibility with the latest computers and devices.
Method 1: Clean Install Ventura from Bootable USB (For M1 & M2 Mac)
Clean install from a bootable drive is currently the best approach to install macOS to an external drive. This also applies to macOS Ventura. Generally, there are two different ways to make a bootable macOS installer. One is using the GUI app and the other is using Terminal command tool.
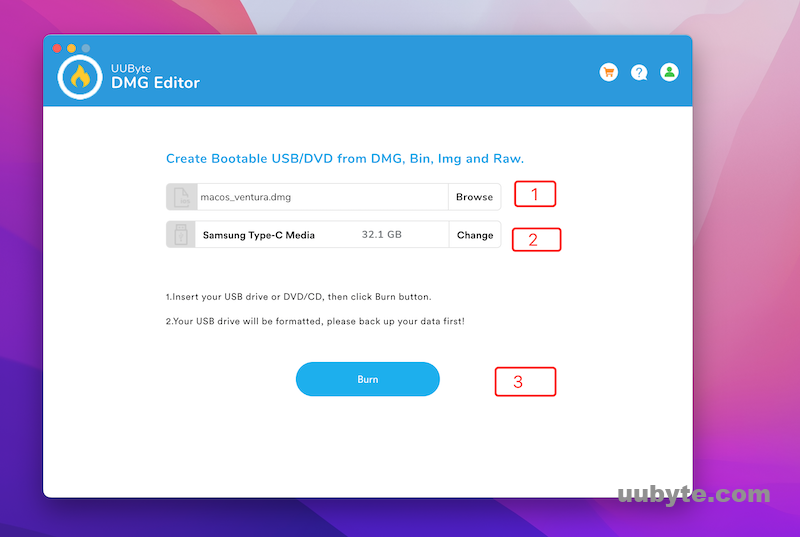
Option 1 – Create Ventura Bootable USB with DMG Editor
[Update] We received a lot of feedback asking if there were a simple method available to create a macOS Ventura bootable drive. People hate inputting commands. GUI is more preferable. Hence, we will introduce a new easy method in here.First, download macOS Ventura dmg file from here: https://www.uubyte.com/download-macos-ventura-dmg-file.html
Second, download DMG Editor and install it on your Mac. After that, open the app and connect a USB drive to Mac. Next, import Ventura dmg file into the program and burn the dmg file to USB. Wait about five minutes and a bootable drive will be ready. Easy enough, right?
Option 2 – Create Ventura Bootable USB with Terminal
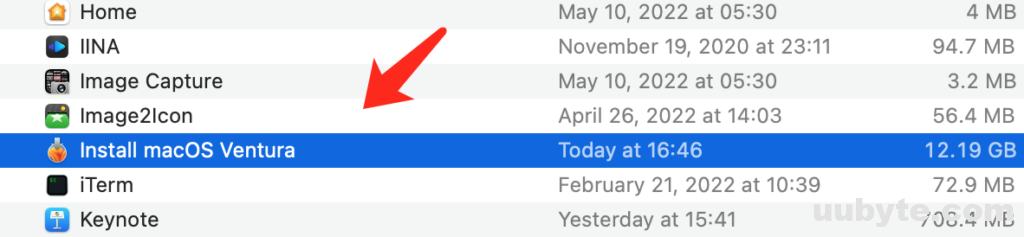
1. Download macOS Ventura Installer App
You can download macOS Ventura installer app either from Mac App Store or from this link. Once the process is completed, you will see an app named Install macOS Ventura in Application folder.
2. Create a Bootable macOS Ventura USB Install Drive
Now, plug in a USB drive into Mac and make sure you can see the drive name in Finder’s left sidebar.
Next, open Terminal app and get the volume name of USB drive with this ls command. In my case, the volume name is SAMSUNG, which will be used in next command.
ls /Volumes
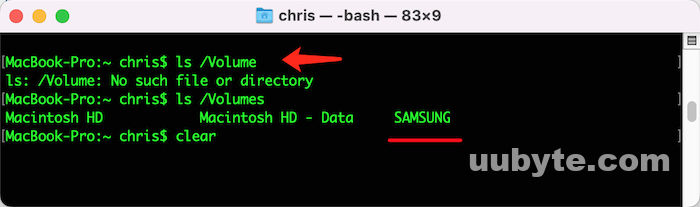
From this time, type the following command to create a bootable Ventura USB. Make sure to change the volume name SAMSUNG to the right one.
sudo /Applications/Install\ macOS\ Ventura.app/Contents/Resources/createinstallmedia –volume /Volumes/SAMSUNG
Wait about 10 minutes and the USB will become bootable after the task is finished successfully. You can now use this USB for macOS installation.
————Steps After Creating Bootable USB————
Once you get a bootable macOS Ventura USB, please follow the steps in below to install macOS Ventura on an external SSD.
Step 1: Format External SSD on Mac
macOS Ventura can be only installed on a drive with GUID partition table scheme. Unfortunately, portable SSD usually comes with MBR by default. You have to format the USB on Mac to change the partition scheme.
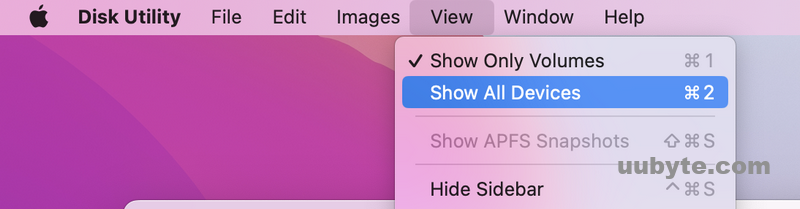
To do this, connect your external SSD to Mac and open Disk Utility app. Click the View menu and select the Show All Devices option.
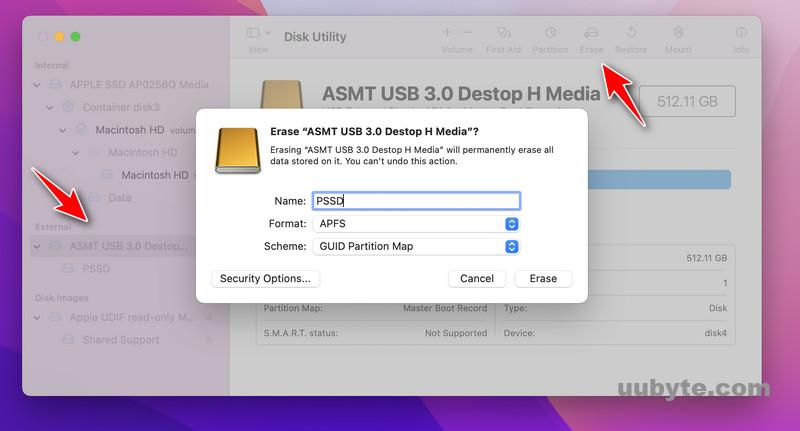
Next, click on the SSD name at the right sidebar and move to the Erase menu at the top center. From the pop-up menu, give a name for this SSD and choose GUID from Scheme list. The file system should be APFS.
After the SSD is formatted, please keep it attached to Mac and don’t disconnect it.
Step 2: Boot Mac from USB Installer
Mac boots from internal startup disk by default. To boot Mac from an external disk, you have to do additional actions.
For Intel based Mac, please reboot your Mac and keep pressing the Option key to launch Startup menu, where you can choose the disk to boot from. At this time, please click on the drive name saying Install macOS Ventura.
For M1 and M2 Mac, the process is a quite different. First, shutdown the Mac. Wait a few seconds and long press the Power button. It will load Startup options at first. After that, you will see a list of bootable drives available at this time. Finally, pick up the Ventura volume to start installing macOS.
Step 3: Install macOS Ventura to External SSD
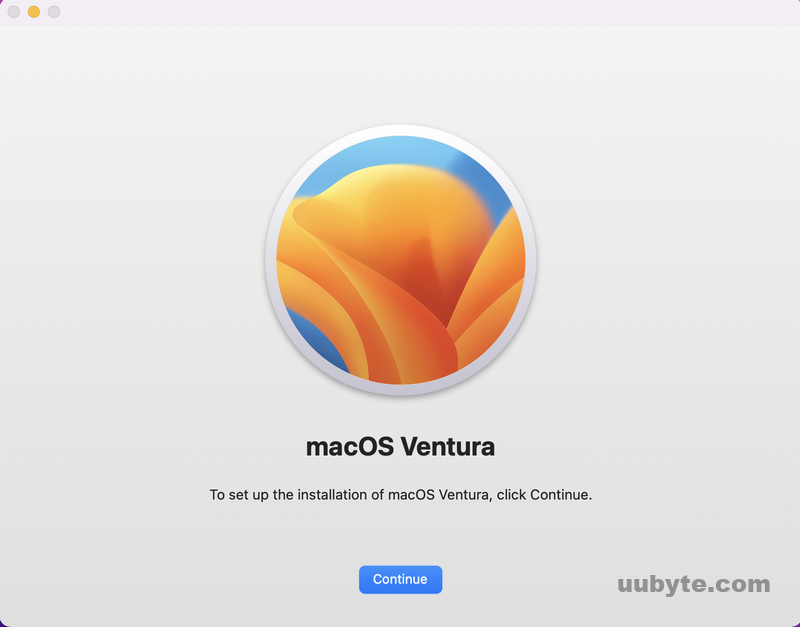
Once the Ventura installation wizards is launched, it will first verify the USB and installer at first. Make sure both of them are working well.
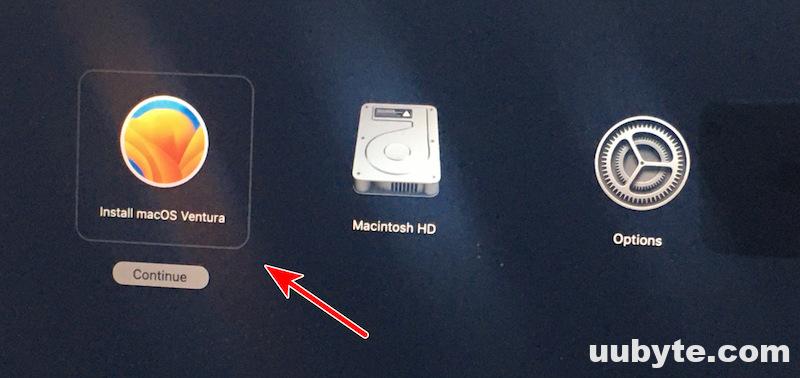
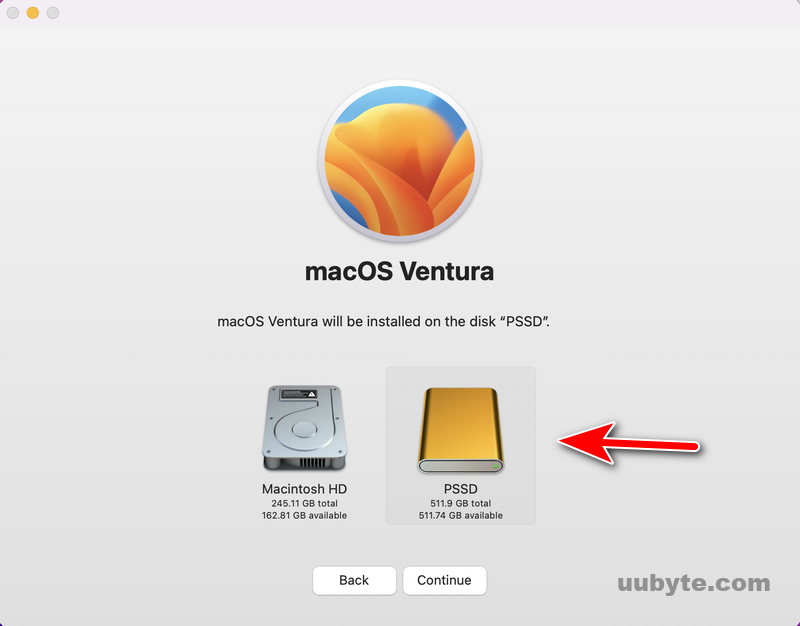
Click the Continue button to proceed. The installer only lists the internal SSD by default. You need to click Show All Disks… option to display all available disks.
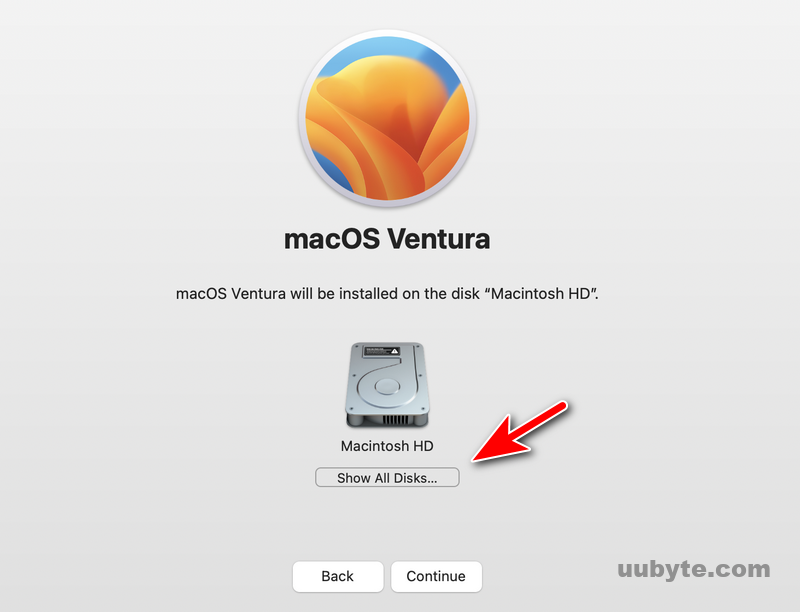
Next, choose the external SSD as the destination to install Ventura. In our example, it is PSSD. Please don’t select the internal Macintosh HD as it will erase the OS on your Mac.
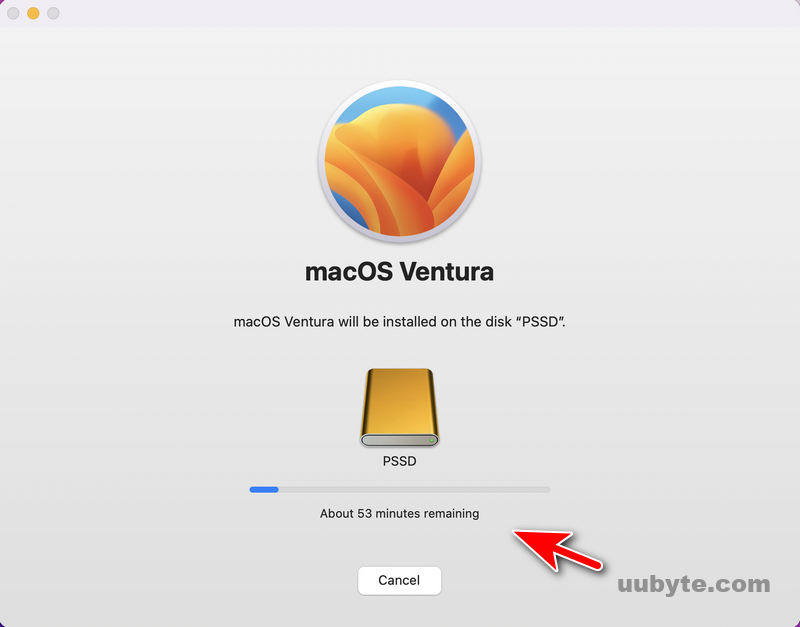
After that, follow the screen prompts to install macOS Ventura on external SSD. This will take about 50 minutes.
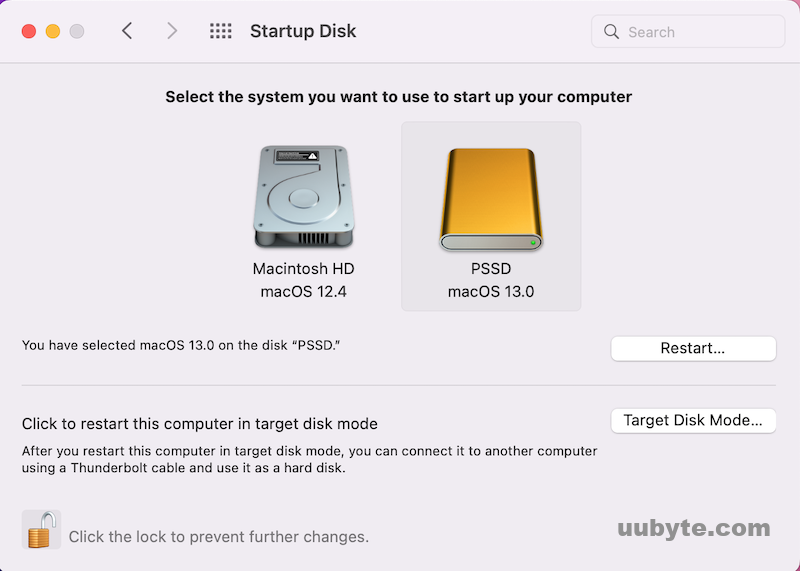
When the installation is completed, it asks you to restart the Mac. At this time, your Mac will be booted from external SSD and you have to follow the screen prompts to finish the setup process. Now, you can see this external SSD as a bootable device in Startup Disk.
Method 2: Network Install Ventura in Recovery Mode (for Intel Mac)
macOS Recovery mode is a special mode that you can boot your Mac to fix issues with the computer. This is very important feature for Intel based Macs.
When a Mac boots into Recovery mode, you’ll be able to access various useful tools that can help you fix hardware and software issues. One of the most popular tools in Recovery mode is the Reinstall macOS. This tool can help you install a flash copy of macOS to a target drive.
Here’s how to install macOS Ventura to external SSD in Recovery Mode:
Step 1. Restart your Mac and hold down the Command+R keys until you see the Apple logo or a spinning circle.
Step 2. When the macOS Utilities window appears, choose Reinstall macOS.
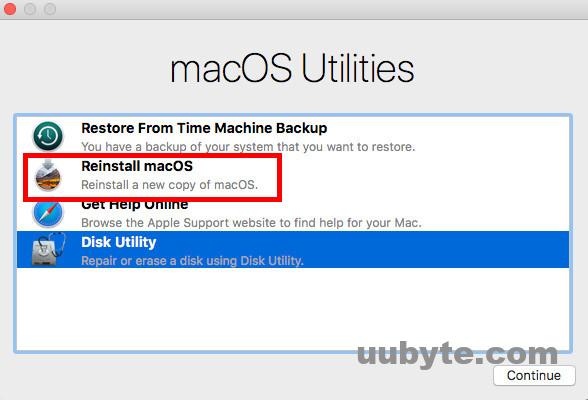
Step 3. Click Continue and follow the instructions to choose a destination disk to hold the macOS system.
Step 4. Once the installation is done, you can restart the Mac and run macOS Ventura from external SSD.
Method 3: Restore from a Bootable Backup
Backup software such as Carbon Copy Cloner and SuperDuper have the ability to create a bootable backup of Mac’s internal drive, including macOS, apps and user data. After that, you can restore the backup to another drive and make it bootable.
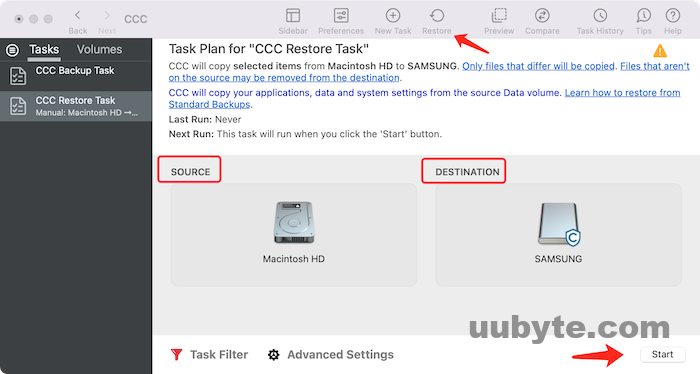
In here, we will take Carbon Copy Cloner (CCC) as example as it is the most popular backup software on Mac.
One way is to use the "Restore from Backup" feature in the CCC menu bar. This will allow you to select a source and destination and CCC will restore everything from the source to the destination.
Another way to restore from a CCC backup is to use the "Clone" feature in the CCC menu bar. This will allow you to select a source and destination, but CCC will only restore files that have changed since the last backup. This is a good option if you only need to restore a few files or if you want to save time by only restoring what has changed.
If you need to restore an entire system from a CCC backup, the best option is to use the "Bootable Backup" feature in the CCC menu bar. This will create a bootable clone of your system on the destination drive. You can then boot from the destination drive and use CCC to restore your system.
Wrapping Up
Installing Ventura to an External SSD is a very complex process and the result may vary from device to device. It is common to come across unexpected bugs and issues. So it is not 100% guaranteed although the above methods work well on my MacBook Pro. If you have issues during the installation, please contact us with details, we’d love to work together to solve the problem.