
Preparing for a macOS bootable disk is very crucial for system upgrade, downgrade and troubleshooting. A macOS DMG file can be a great help when it comes to creating bootable USB installer. With a macOS DMG file, you can create a bootable installation media on a Windows PC or Mac. However, it is not the way recommended by Apple official, which only provides a macOS installer app you can download from Mac App Store for this purpose. Hence, this only works on macOS based on the solution Apple offers. If you are unable to login a Mac, then this method becomes useless.
In fact, it is not difficult to download macOS dmg file from third-party sources. You can find hundreds of websites doing this. However, it is risky to use them as the publisher could inject virus, malware or adware along with macOS installation file.
But no worries! It is totally possible to create a clean macOS dmg file by your own without safety concern as long as you have a Mac computer at hand. We will share all details regarding this topic. Please read this post carefully to make a bootable macOS DMG file by you.
Preparation
Before diving into the details, there are a couple of things you should prepare for.
First, a USB flash drive with at least 16GB storage. And USB 3.0 device is more preferred as it has much faster reading and writing speed than traditional USB 2.0 device. This reduces the time dramatically for file writing and boost the file copying time during installation process. And don’t forget to back up the drive.
Secondly, macOS installation app. You can download it from Mac App Store by searching the name. Or click the above link directly to download a specific version of macOS:
macOS Big Sur: https://apps.apple.com/us/app/macos-big-sur/id1526878132?mt=12
macOS Catalina: https://apps.apple.com/us/app/macos-catalina/id1466841314?mt=12
macOS Mojave: https://apps.apple.com/us/app/macos-mojave/id1398502828?mt=12
macOS High Sierra: https://apps.apple.com/us/app/macos-high-sierra/id1246284741?mt=12
Once the download is finished, you will see the installation app (Install macOS Big Sur as example) in Application folder.

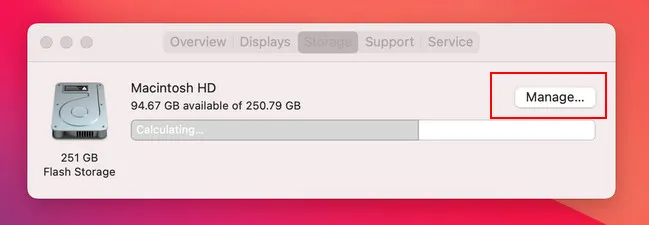
Lastly, make sure there are enough free disk space (20 GB and more) left on your Mac. If not, you need to delete unused and large files on your Mac with the native service (About This Mac -> Storage -> Manage)
How to Create macOS Big Sur DMG File (Big Sur as Example)
Once you get the macOS installation app and a USB drive, then it is time to create a macOS DMG file by using the following commands. In the following example, we will use Big Sur as demonstration as a lot of users want to test the latest version of macOS.
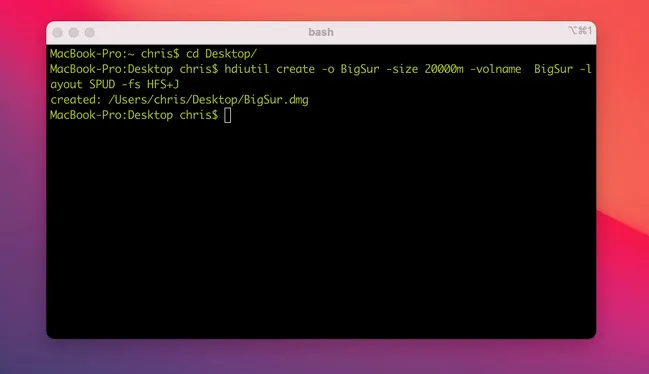
Now, open Terminal app from Launchpad and type to enter into Desktop folder of current user. This is not mandatory, just for convenience.
cd Desktop
Next, type this command to create a new dmg file (BigSur.dmg) in Desktop folder:
hdiutil create -o BigSur -size 20000m -volname BigSur -layout SPUD -fs HFS+J
- 20000m: the file size of new dmg file in MB.
- BigSur: the volume name of dmg file.
For reference, hdiuti is the built-in utility for manipulating disk image file on macOS. You can check this webpage for more details.
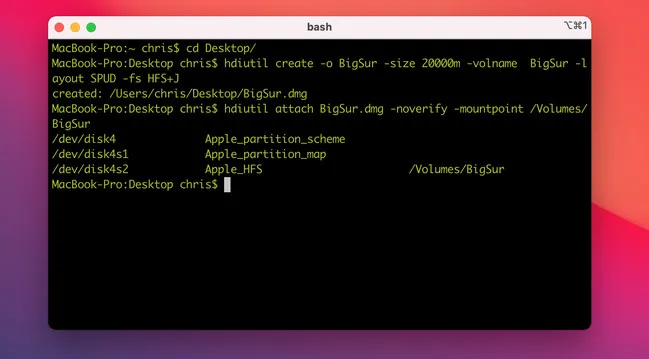
Once the dmg disk was created, please double click to mount it or use this command instead. The mounted path is at /Volumes/BigSur.
hdiutil attach BigSur.dmg -noverify -mountpoint /Volumes/BigSur
When the disk image is mounted successfully, you can copy macOS installation files to it with createinstallmedia command. Here is the example for macOS Big Sur:
sudo /Applications/Install\ macOS\ Big\ Sur.app/Contents/Resources/createinstallmedia --volume /Volumes/BigSur –nointeraction
Note: Make sure change the volume name (BigSur in this example) to the one you changed previously.
You will be asked to input the login password to grant permission of above operation. After that, wait for a couple of times before you receive a completed message, saying Install media now available.

Finally, double click the mounted name in Finder app to eject the disk from your Mac.
Reminder: If you encounter any error message during the above process, make sure check the command are entered correctly, especially the command parameters you have modified, such as file path, volume name.
Summary
This is a complete tutorial for creating macOS DMG file on a Mac. Once it is done successfully, you can burn the dmg file to USB to make a bootable USB installer on a Windows PC or Mac.

Petty is editor in chief at UUByte and writes various topics about Windows and Mac to help people make the most of current technology.