Table of Contents
There are a few reasons why someone might want to install Windows 10 on their Mac. Maybe you need to use a specific Windows-only program for work or school. Maybe you’re a gamer and want to play the latest PC games. Or maybe you just prefer Windows over macOS.
Whatever the reason, it’s actually pretty easy to install Windows 10 on a Mac. You’ll just need a copy of the Windows 10 installer and a USB drive. Once you have those, you can follow the steps below to get Windows 10 up and running on your Mac.
Before you begin, there are a few things to keep in mind. First, you should back up your Mac before installing any operating system. This way, if something goes wrong, you can always restore your Mac to its original state.
Second, you’ll need to decide which version of Windows 10 you want to install. If you want to use Windows 10 for gaming, you’ll need the 64-bit version. If you just want to use specific Windows programs, the 32-bit version will probably suffice.
Finally, you should know that installing Windows 10 will overwrite your Mac’s existing operating system. This means you won’t be able to boot into macOS after installing Windows 10. If you want to be able to switch between macOS and Windows 10, you’ll need to use a tool like Boot Camp.
Why Choosing Windows 10
There are a few key reasons why you might want to choose Windows 10 over Windows 7.
First, Windows 10 is the most recent version of Windows, which means it includes the latest features and security updates.
Secondly, Windows 10 is designed to work with the latest hardware, which means it will likely provide a better experience on newer computers.
Finally, Windows 10 is a more versatile operating system than Windows 7, which means it can be used for a wider range of tasks.
So, if you’re looking for the best Windows experience, you should definitely choose Windows 10.
Difference between Intel and Apple Silicon Mac (M1 & M2)
Apple Silicon Macs are the first Macs to use Apple-designed processors, based on the A12Z Bionic chip. The new Mac mini, MacBook Air, and MacBook Pro use the Apple M1 chip, while the iMac uses the M1X chip. The M1 chip is a system on a chip (SoC) that integrates the CPU, GPU, I/O, and other components onto a single chip. The M1 chip is manufactured using a 5-nanometer process, and it is the first personal computer chip to use this process.
The M1 chip is capable of running multiple apps simultaneously with no performance degradation. The M1 chip is also power efficient, and it is designed to provide long battery life.
The main difference between Intel and Apple Silicon CPU is that Intel CPUs are based on the x86 architecture while Apple Silicon CPUs are based on the ARM architecture. The x86 architecture is a complex instruction set architecture (CISA) while the ARM architecture is a reduced instruction set architecture (RISC). This means that Intel CPUs are more complex and can handle more complex instructions than ARM CPUs. However, this also means that Intel CPUs are more expensive to manufacture than ARM CPUs. Another difference between Intel and Apple Silicon CPUs is that Intel CPUs are made using a 14-nanometer process while Apple Silicon CPUs are made using a 5-nanometer process. This means that Apple Silicon CPUs are more power efficient than Intel CPUs.
In conclusion, some of the apps that used to work on Intel Mac won’t be able to run on Apple Silicon Mac. This means the steps for installing Windows 10 on Intel Mac and M1 Mac are quite different. We will cover both solutions in the following sections.
What You Need to Install Windows 10 on Mac
Installing Windows 10 on Mac is highly challenging and time consuming task. You need to prepare for a couple of things to complete the task:
- Windows 10 ISO File
- USB flash drive with 8 GB or above storage, USB 3.0 preferred.
- Boot Camp Assistant App
- Virtualization software like Parallels Desktop
How to Install Windows 10 on Mac with Bootcamp
Windows 10 is Microsoft’s latest operating system, and Mac users can now take advantage of the new features and improvements by installing it on their computers. Installing Windows 10 on a Mac is a simple process that can be done using the Boot Camp Assistant software.
Boot Camp is a utility that comes with your Mac and lets you switch between macOS and Windows. When you restart your Mac, you can choose which operating system to use.
Before you begin, make sure your Mac meets the minimum system requirements for Windows 10. You will also need a copy of the Windows 10 installation media.
Once you have everything you need, follow these steps to install Windows 10 on your Mac using Boot Camp:
1. Open the Boot Camp Assistant application. You can find it in the Utilities folder in your Applications folder.
2. Click Continue and read the information on the next screen. When you’re ready to continue, click Continue again.
3. Select the amount of space you want to allocate for Windows. The default is to use the maximum amount of space available, but you can choose a smaller amount if you want.
4. Select the Windows 10 installation media. If you have the installation media on a USB flash drive, select it from the list. If you have an ISO file, select it and click Open.
5. Click Continue and wait for the Boot Camp Assistant to create the Windows partition and copy the installation files.
6. When the process is complete, click Finish and then click Restart.
7. Your Mac will restart and boot into Windows. Follow the on-screen instructions to complete the Windows 10 installation.
Once Windows 10 is installed, you can use Boot Camp to switch between macOS and Windows. To switch to macOS, restart your Mac and hold down the Option key when it starts up. To switch to Windows, restart your Mac and select the Windows partition.
You can also uninstall Windows 10 from your Mac using the Boot Camp Assistant. Just open the application and click the Uninstall button.
How to Install Windows 10 on Mac without Bootcamp
The Boot Camp Assistant is a multi boot utility included with Apple Inc.’s Mac OS X that assists users in installing Microsoft Windows operating systems on Intel-based Macintosh computers.
The utility guides users through non-destructive disk partitioning (including resizing of an existing HFS+ partition, if necessary) of their hard disk drive and installation of Windows device drivers for the Mac.
Boot Camp does not support Windows RT, Windows 10 S or Linux.
How to Install Windows 10 on Mac without Bootcamp:
The process of installing Windows 10 on a Mac without Bootcamp is very simple and straightforward. All you need to do is follow the steps below.
1. The first thing you need to do is download the Windows 10 ISO from Microsoft.
2. After that, you need to create a bootable USB drive. For doing this, UUByte ISO Editor for Mac is one of the best apps to make Windows 10 bootable USB on Mac.
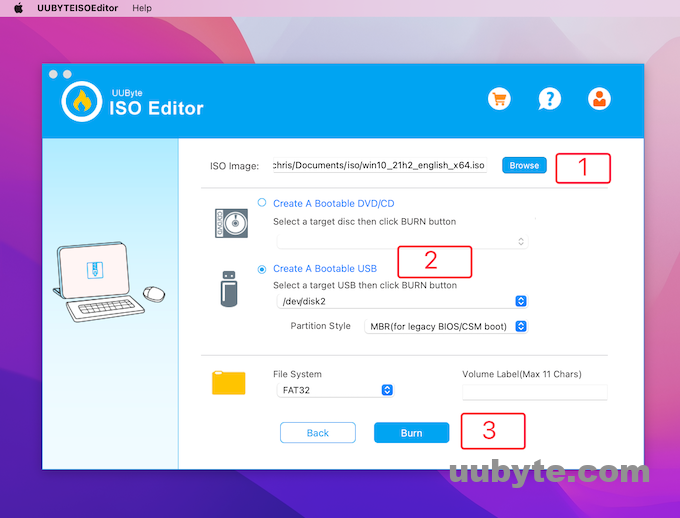
3. Click the above button to download the app and click the Burn button when the app is launched.
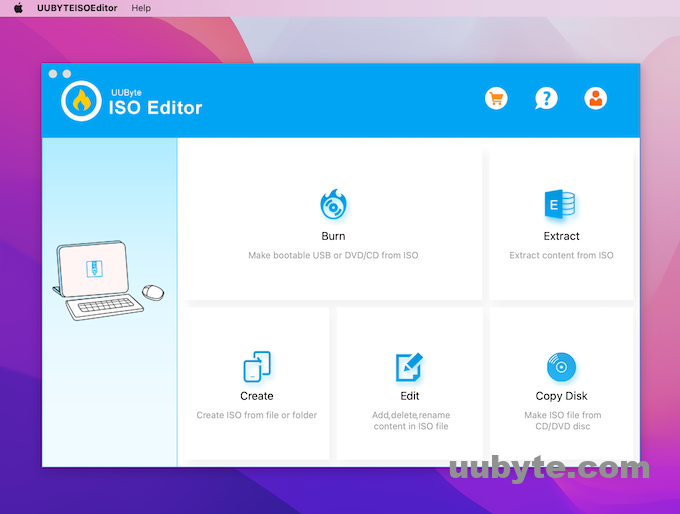
4. This will lead to the page for creating bootable USB. Follow the prompt to complete the process.
5. Now, you have a bootable Windows 10 USB drive, you need to boot the computer from that USB drive.
6. Upon successful booting, follow the screen prompts to start the installation process.
7. When the installation is completed and you manage to get into Windows 10 desktop, you need to activate Windows 10 on this Mac.
How to Install Windows 10 on Mac M1
Windows 10 on Mac M1 is not officially supported by Microsoft. However, there are a few ways to get it working. Here’s how to install Windows 10 on Mac M1 with VMware Fusion.
VMware Fusion is a virtualization solution for Mac users that allows them to run Windows on their Macs. Fusion provides a seamless way to switch between your Mac and Windows applications, and it’s easy to set up and use. Fusion also supports multiple monitors, and you can even use your Mac’s trackpad and keyboard to control your Windows applications.
Follow these steps to install Windows 10 on Mac M1 using VMware Fusion:
1. Download and install VMware Fusion.
2. Launch VMware Fusion and click the Add button.
3. Select the option to install Windows from an ISO file.
4. Select the ISO file for Windows 10 and click the Continue button.
5. Enter the product key for Windows 10 and click the Continue button.
6. Select the Windows 10 edition and click the Continue button.
7. Select the installation type and click the Continue button.
8. Select the hard disk type and click the Continue button.
9. Select the amount of RAM and click the Continue button.
10. Enter the password for your VMware account and click the Login button.
11. Click the Agree button to accept the terms and conditions.
12. Click the Finish button.
13. Click the Customize Settings button.
14. Click the Hardware tab.
15. Click the Processors and Memory tab.
16. Select the option to enable Hyper-V.
17. Click the OK button.
18. Click the Power On button.
19. Follow the instructions to install Windows 10 on your Mac.
How to Install Windows 10 on Mac with Parallels Desktop
Parallels Desktop is a software that allows you to run Windows on your Mac. This can be useful if you need to use specific Windows-only programs or if you want to play Windows-only games. Parallels Desktop is a paid program, but there is a free trial available.
Installing Parallels Desktop is fairly simple. Once you have downloaded the program, double-click on the DMG file to open it. Then, drag the Parallels Desktop icon into your Applications folder. Once it has been installed, you can launch Parallels Desktop from your Applications folder.
When you first launch Parallels Desktop, you will be prompted to choose what kind of installation you would like. You can either install Windows from an ISO file, an optical drive, or from your existing Boot Camp partition. If you choose to install Windows from an ISO file, you will need to have a valid Windows ISO file. You can usually acquire this by buying a copy of Windows from Microsoft or by downloading a Windows ISO from a third-party site.
Once you have chosen your installation method, you will be prompted to enter your product key. If you are installing Windows from an ISO file, you will also need to select the edition of Windows that you want to install. After you have entered your product key and chosen your edition of Windows, the installation process will begin.
The installation process can take a while, so be patient. Once the installation is complete, you will be prompted to reboot your computer. Once your computer has rebooted, you will be able to use Windows on your Mac.
Parallels Desktop is a great way to run Windows on your Mac. The program is easy to install and use, and it provides a great way to use specific Windows-only programs or to play Windows-only games. If you need to use Windows on your Mac, Parallels Desktop is a great option.
How to Install Windows 10 on Mac without USB
Windows 10 is the latest operating system from Microsoft. It is a huge improvement over Windows 8 and 8.1, and it is also much more stable than those operating systems. Windows 10 is also much more user-friendly, and it comes with a lot of new features that make it a great choice for both home and business users.
If you are a Mac user, you might be wondering if you can install Windows 10 on your Mac without USB. The answer is yes, you can, and it is actually quite easy to do. In this article, we will show you how to install Windows 10 on Mac without using a USB drive.
The first thing you need to do is to download the Windows 10 ISO file from Microsoft’s website. Once you have downloaded the ISO file, you need to open Bootcamp Assistant app. Follow the on-screen instructions to complete the installation process, and then you will be able to use Windows 10 on your Mac.
For M1 or M2 Mac, please use virtualization software to install Windows 10 on Mac. You don’t need a USB drive either.
Frequently Asked Questions
Can you install Windows 10 on Mac for free?
Yes, you can install Windows 10 on Mac for free. But you will need to purchase a Windows 10 license in order to activate it on your Mac.
Can I install Windows 10 on a Mac computer?
Yes, you can install Windows 10 on a Mac computer using Boot Camp. Boot Camp is a built-in utility that allows you to run Windows on your Mac.
How do I manually install Windows 10 on a Mac?
If you don't want to use Boot Camp to install Windows 10 on your Mac, you can do it manually. Here's how: 1. Create a Windows installation disc or drive. 2. Insert the Windows installation disc or drive into your Mac, and then double-click the Install Windows application in the Windows folder or on the disc. 3. Follow the onscreen instructions to install Windows. 4. After Windows installation completes, your Mac starts up in Windows. 5. To switch between macOS and Windows, restart your Mac and hold the Option key while it starts up.
Is running Windows on Mac a good idea?
It depends. If you need to use specific Windows-only applications, then running Windows on your Mac is a good idea. However, if you're just looking to use general applications, then macOS is a better option.
Is Boot Camp safe to use on a Mac?
There is no definitive answer to this question as it depends on a number of factors, including how you use Boot Camp and what type of Mac you have. That said, in general, Boot Camp is safe to use on most Macs. However, there are a few potential risks to be aware of, which we will discuss in more detail below. One potential risk of using Boot Camp is that it can void your Mac's warranty. This is because Apple specifically states in its warranty that installing any type of non-Apple software on your Mac will void the warranty. While Boot Camp is an official Apple product, it is still considered non-Apple software. Therefore, if you have any problems with your Mac after installing Boot Camp, you will not be able to take advantage of Apple's warranty coverage. Another potential risk of using Boot Camp is that it can cause problems with your Mac's hardware. This is because Boot Camp requires you to partition your Mac's hard drive, which can sometimes lead to data loss or corruption. Additionally, if you are not careful when installing Boot Camp, you could accidentally delete important system files, which could render your Mac unusable. Overall, Boot Camp is safe to use on most Macs, but there are a few potential risks to be aware of. If you are concerned about any of these risks, we recommend talking to an Apple specialist before installing Boot Camp on your Mac.
What is the cost of Windows 10 operating system
The cost of Windows 10 varies depending on the edition and the device. The price for the Home edition is $139, while the Pro edition is $199. For a complete list of pricing, visit Microsoft's website.
How do you access Windows on a Mac?
There are a few ways to access Windows on a Mac. One way is to use a virtual machine, such as Parallels Desktop or VMware Fusion. This will allow you to run Windows and Mac OS side-by-side, and you can switch between the two operating systems at any time. Another way to access Windows is to use Boot Camp. This will allow you to install Windows on your Mac, and you can choose to boot into either Windows or Mac OS when you start your computer. Finally, you can also use remote desktop software to access a Windows computer from your Mac. This can be useful if you need to use specific Windows-only software or if you want to connect to a work or home computer.
What is the best way to install Windows on a Mac?
The best way to install Windows on a Mac is to use Boot Camp. Boot Camp is a utility that comes with your Mac and lets you install Windows on a separate partition. Boot Camp will create a Windows partition on your hard drive and then reboot your Mac into Windows. Once in Windows, you can install your favorite Windows programs and games.
Can I make a bootable Windows 10 USB on Mac?
Yes, you can create a bootable Windows 10 USB on a Mac. The process is relatively simple and only requires a few steps. First, you will need to download the Windows 10 ISO file from the Microsoft website. Next, you will need to use the Disk Utility application to create a bootable USB drive. Finally, you will need to use the Boot Camp Assistant application to install Windows 10 on your Mac.
Is a Windows 10 ISO free?
Yes, a Windows 10 ISO is free for download. You can either purchase a copy of Windows 10 from Microsoft, or you can download a free trial version from the Microsoft website.