Table of Contents
Creating a Windows 11 bootable USB on Apple Silicon Mac isn’t an easy process because Apple Silicon is an ARM based architecture that is different from the old X86. Many traditional methods for creating bootable USB on Mac failed to work on Apple Silicon Mac, including M1 and M2 Mac.
Don’t worry. We will help you go through all the necessary steps to create a Windows 11 bootable USB on M1 or M2 Mac.
Download Windows 11 ISO First
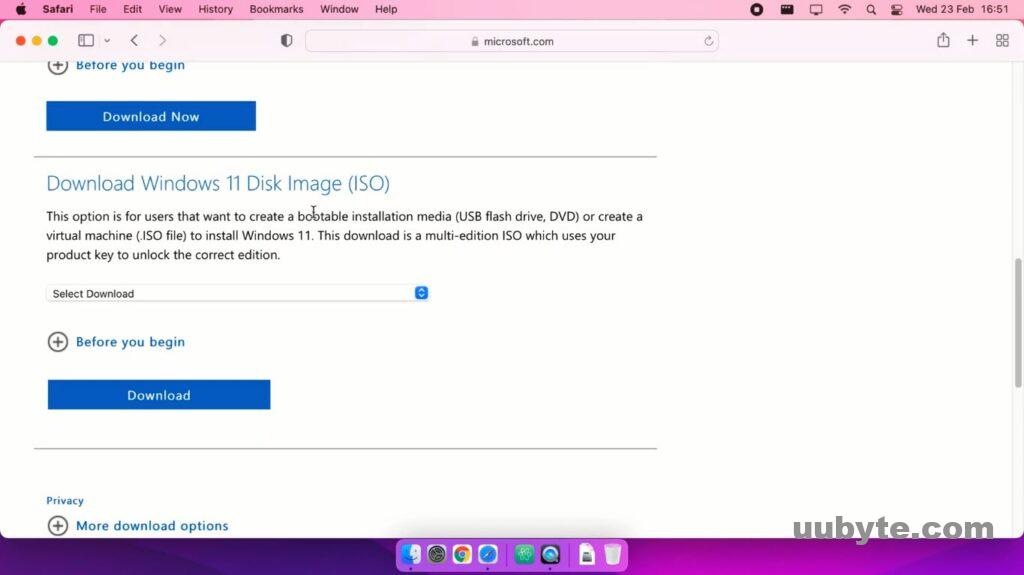
The first step you have to download the windows 11 iso and the tool for creating bootable USB on Mac M1. By visiting the download page of Windows 11 on Microsoft, you can get the Windows 11 ISO in several ways. Among all the methods, I recommend you to use the option called “Download Windows 11 Disk Image (ISO)”.
- Now click Download.
- Then select your language.
- Then confirm and then select 64-bit Download.
- Now ISO File is getting Download.
Method 1: Create Windows 11 Bootable USB on Mac M1 with ISO Editor
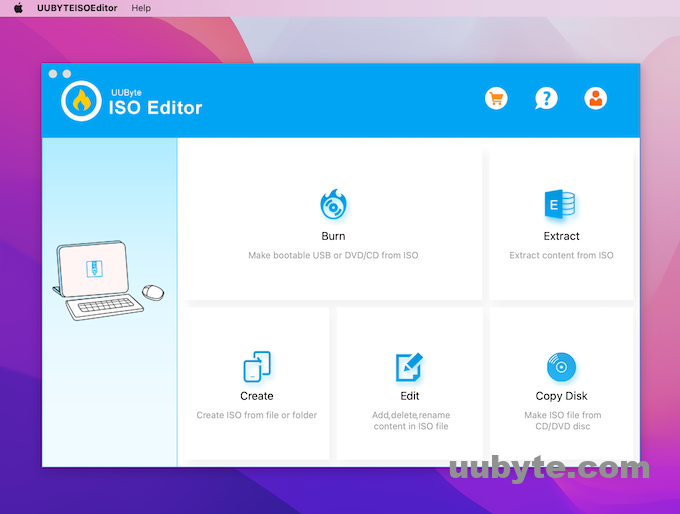
Unlike Terminal, UUByte ISO Editor is a powerful GUI based app for creating Windows bootable USB on Mac. This means the whole process would be much more easier and user friendly. You don’t need to type a single command to complete the task. What you should do is to make a few mouse clicks. So it is the best solution to make a Windows 11 bootable USB on M1 Mac.
Step 1: Download the latest version of UUByte ISO Editor on your Mac. This app fully supports M1 & M2 Mac and macOS Monterey.


Step 2: Launch the app installation wizard and drag-drop the app icon to Application folder. By doing this, you can open the app from Launchpad.
Step 3: Now, connect a USB drive and open UUByte ISO Editor on M1 Mac. Then, click the Burn tab on the main interface.
Step 4: In this part, you should import Windows 11 ISO and choose the USB drive you just plugged in. If the USB is not visible, please make sure your Mac is not in Dark mode.
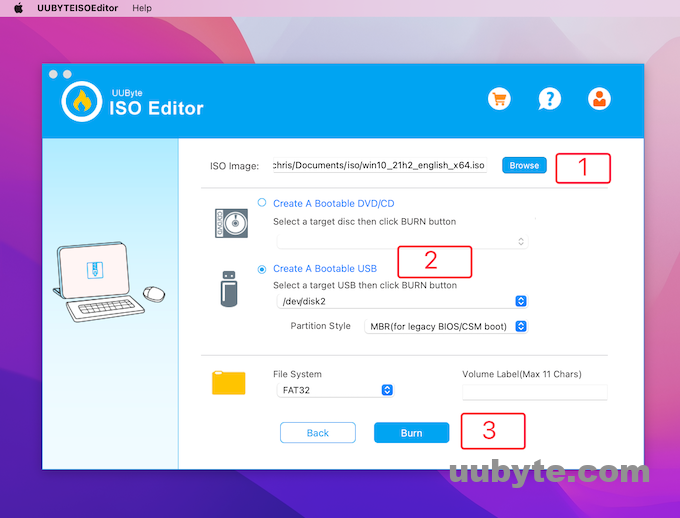
Step 5: Click the Burn button when the setting part is done. At this time, ISO Editor will mount Windows 11 ISO and copy all files from ISO to USB drive.
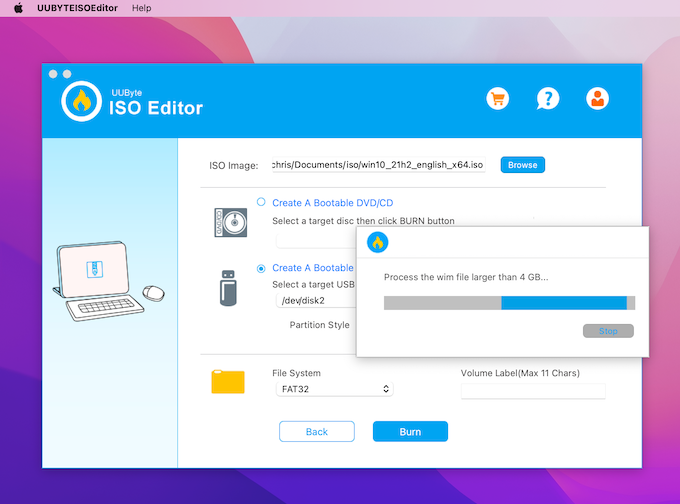
Step 6: At the end of burning process, ISO Editor will cut down the install.win file so it can be sit on a FAT32 partition. You should wait a couple of minutes when this is completed.
Method 2: Make Windows 11 Bootable USB on Mac M1 Using Terminal
To make a windows 11 bootable USB on M1 Mac, first, you have to get the ISO of Windows 11. Following that make sure to prepare a USB with at least 8 GB of storage.
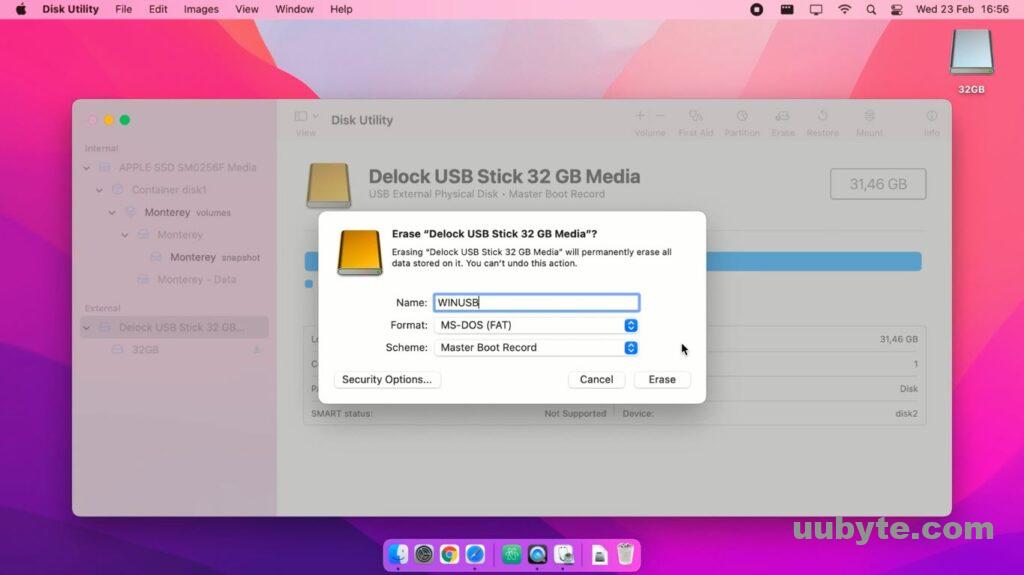
Step 1. Connect the USB to the computer and launched the disk utility. You can launch the disk utility by searching in the spotlight or opening it from the applications directory.
Step 2. Since we are creating a bootable USB for Windows 11, make sure you implement the following settings:
- Name your USB whatever you want, in my case I will be naming it WinUSB.
- Format: MS-DOS (FAT)
- Scheme: Master Boot Record
After configuring dimension settings, click erase to wipe the USB’s data and prepare for a bootable USB.
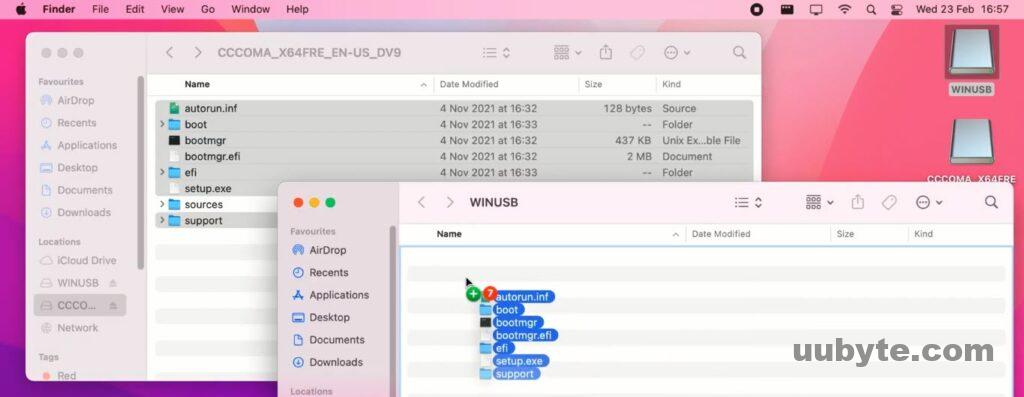
Step 3. It is the moment where you have to copy all of the windows 11 ISO files into the USB except for the install.wim in the source’s directory. So, mount the windows 11 ISO, press command + A to select all then copy and open the USB paste right there.
Note: In the below screenshot, I have copied everything except the sources directory. For that later I will create a directory with the name of sources on the USB, and copy all the files except the install.wim.
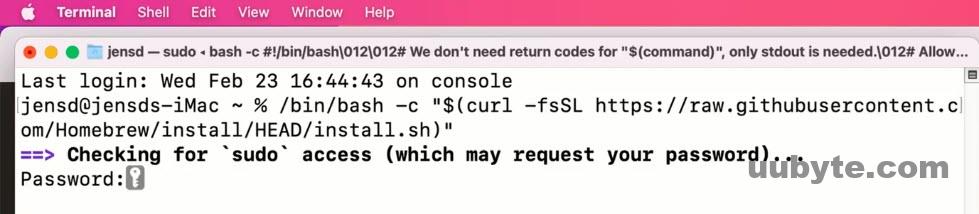
Step 4. Since we cannot copy more than 4 GB of files inside a Fat-32 file system, for that we’ll have to use homebrew. This way we can split the install.wim file into two separate files inside the USB. First, you’ll need to install homebrew by executing the following command.
/bin/bash -c "$(curl -fsSL https://raw.githubusercontent.com/Homebrew/install/HEAD/install.sh)"
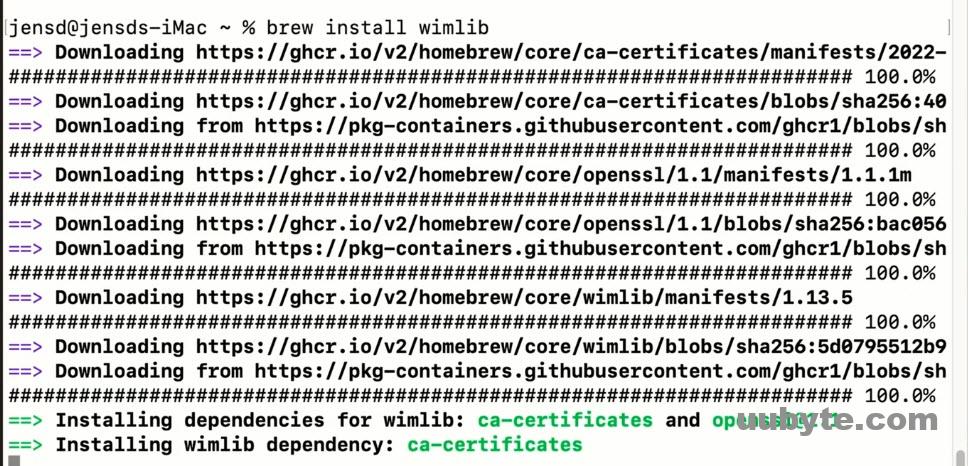
To split the install.wim file, we have to install the wimlib too, for that execute the below command.
Step 5. The final step is to split the install Wim and copy it into the USB into the source’s directory. Just execute the below command and everything will be done easily.
wimlib-imagex split /Volumes/CCCOMA_X64FRE_EN-US_DV9/sources/install.wim /Volumes/WinUSB/sources/install.swm 4000
- In the mentioned command, replace the WinUSB with the name of your USB Flash drive.

Now terminal will successfully create the bootable disk, and if you want to start an installation process, your USB will be ready in a few seconds.
Windows 11 Advantages over Windows 10
Windows 11 is the latest version of Windows and it is far from Windows 10 in many terms, features, designs, and productivity. Let’s have a look at desktop updates in windows 11. The taskbar has gotten a facelift and the applications and icons are on the center bottom of the screen rather than at the left on Windows 10.
The icons and animations have been redesigned to give users real and contractual feelings. Snap layouts are also a massive update that automatically suggests snap presets to manage all the windows you have opened. Windows 11 auto-save helps users to recall websites and pages that they had accidentally closed or deleted.
Auto HDR is a great new update for gamer users, Microsoft says that over 1000 games will be automatically enhanced with HDR with no additional work or set from the player or the developer. DirectStorage for Windows is news too. This feature supports far higher decompression bandwidths key for both streaming and load time scenarios. This will allow your PC to wake up 25% faster from sleep.
In short, updating to Windows 11 represents a shorter incident where apps load faster and your PC wakes from sleep with comfort and many untold features.
Pros and Cons of Apple Silicon Chip (M1 & M2)
Apple announced that they are moving away from Intel to ARM-based custom Apple silicon for future Macs. The ARM chips will provide users with better performance, power management, and a bunch of other features which we will have a look at today.
- Apple silicon is an SoC (System in a Chip.) In simple words, traditional components in computer architecture are all crammed into a single chip.
- Apple silicon will make Macs more secure. Apple has been using its custom silicon for security reasons for iOS devices for years now. And it has implemented some of these security features with its custom T1 and T2 Chips which work alongside the Intel processor. With Apple Silicon, there’s no need for a separate T2 chip, it is all built into one Soc.
- Faster performance, better power management, and better security features are some of the eye-catching Pros and advantages of Apple Silicon Chip. Whereas there are some other minor advantages and improvements in SoC.
Now coming towards some disadvantages or Cons of Apple Silicon M1 Chip.
- Firstly, GPUs Or Multiple Screens Displays are Not Supported. It doesn’t support an external GPU and you will face a problem using it for gaming.
- Moreover, with M1 users and developers will face Glitches with Apps.
System Requirements for Windows 11
For running windows 11 on a computer, the device should have the below requirements. Otherwise, your computer will not be able to run Windows 11 by default. It is not recommended to install Windows 11 on an incompatible device though there are a number of ways to bypass these requirements.
- Processor: 8th-generation Intel CPU, AMD Ryzen 2000, or newer
- RAM: 4 gigabytes or more,
- Storage: 64 GB or more free space
- System Firmware: UEFI and Secure Boot
- TPM (Trusted Platform Module): 2.0(common on motherboards manufactured after 2016)
- Graphics Card: Compatible with DirectX 12 or later
- Display: An HD display with a resolution of at least 720p (1280×720) greater than 9 inches in diameter, 8 bits per color channel
- Internet Connection: You need a fast internet connection home edition requirement.
- Microsoft Accounts: For setting up the device you need to have a Microsoft account, especially Windows 11 Home Edition.
Do Macs Have TPM?
Although Apple has brought many updates since 2006 in the mac operating system, design, and features. Apple doesn’t support TPM with any of their product or operating system. Instead, the Touch ID sensor requires hardware that serves a similar function, and you won’t feel the absence of TPM on your Mac.
Can I Run Windows 11 on a Mac?
The best part is that you can avoid these requirements and install Windows 11 on any Apple computer as long as it is in the virtual environment.
Also, Boot Camp utility is still available on Intel or AMD processors Mac. This is a built-in app developed by Apple to let you run Windows and macOS as dual-boot on Mac. You can achieve dual boot of Windows 11 and macOS by installing Windows 10 first and then upgrading to Windows 11. While upgrading, you can bypass the TPM requirements.
Can Boot Camp Run on a M1 Mac?
Unfortunately, Boot Camp app was removed from Mac that comes with Apple Silicon, such as M1 and M2. Currently, Boot Camp app can be only find in Intel Mac.
Apple’s plan to transition the Mac line to “Apple silicon” (microchips that use ARM tech and other in-house developed technologies) is a complete shift and change. Only the MacBook Pro and Mac Pro have yet to make the transition. Even If you get the ISO of Windows 10/11 ARM edition, you won’t perform a dual boot.
Is Rufus Available for Mac?
Rufus is an exceptional tool that exclusively works to format and create a bootable USB drive for 32-bit and 64-bit versions of Windows 11/10/8/7/XP. But, there is no version of Rufus available for Mac. It is a Windows only program. You can opt for Rufus alternative app to create a Windows bootable USB on Mac.
FAQ Questions
Is Windows 11 supported on Mac?
Windows 11 is not supported on Mac by default as Mac does not have a Trust Platform Module. You can either build a Windows 11 virtual machine or bypass Windows 11 requirement for direct installation on Mac.
Is it possible to install Windows on Mac M1?
Yes. But it is only possible install Windows on Mac M1 as a virtual machine.
What format should my USB be for Windows 11 installation?
You should format the USB to FAT32 when you are trying to make a Windows 11 bootable USB. NTFS is not supported by macOS naturally.
Can Balena Etcher make Windows USB?
No. Balena Etcher can’t make Windows USB for Windows 11 because it does supports Windows partition table.
Is Parallels Free for Mac M1?
Parallels Desktop can be used for free in 15 days. After that, you need to activate the app with a license key.
Is there another software like Rufus?
Yes. UUByte ISO Editor the best alternative to replace Rufus on Mac.
How do I burn a Windows ISO file on a Mac M1?
Download UUByte ISO Editor and burn your Windows ISO file on a Mac M1 afterwards. You can also create a Windows virtual machine on M1 Mac with Parallels Desktop app and burn Windows ISO under virtual machine.
Can you download Windows media creation tool on a Mac?
No. Media Creation Tool is an app that only works in Windows OS.
Conclusion:
Currently, there are three unique solutions to let you create Windows 11 bootable USB on Mac M1. The most popular and free one is using the built-in Terminal utility. However, it is the hardest way to do that. Instead, it will be a much more smooth process with UUByte ISO Editor, the only GUI app for making Windows bootable USB on Mac. Lastly, you can create a Windows 11 bootable USB on M1 Mac if there was a Windows virtual machine being set up on your Mac.