Table of Contents
It is possible for a PC to boot slowly after upgrading from Windows 10 to Windows 11, as the new operating system may require more resources or have different system requirements than Windows 10. Additionally, if there are any compatibility issues or outdated drivers, this could also contribute to slow boot times.
However, it’s important to note that not all PCs will experience slow boot times after upgrading to Windows 11. Many factors can affect system performance, such as the hardware specifications, the number of applications installed, and the overall system health.
If you are experiencing slow boot times after upgrading to Windows 11, there are several methods you can take to improve performance.
1. Run RestoreHealth Command
The RestoreHealth command is a Windows 11 command-line tool used to scan for and repair corrupt or damaged system files. It is used to repair the Windows 11 operating system when it encounters problems such as system crashes, slow performance, or other issues.
Here’s how to use the RestoreHealth command in Windows 11:
Step 1: Open the Start menu and type "cmd".
Step 2: Right-click on "Command Prompt" and select "Run as administrator".
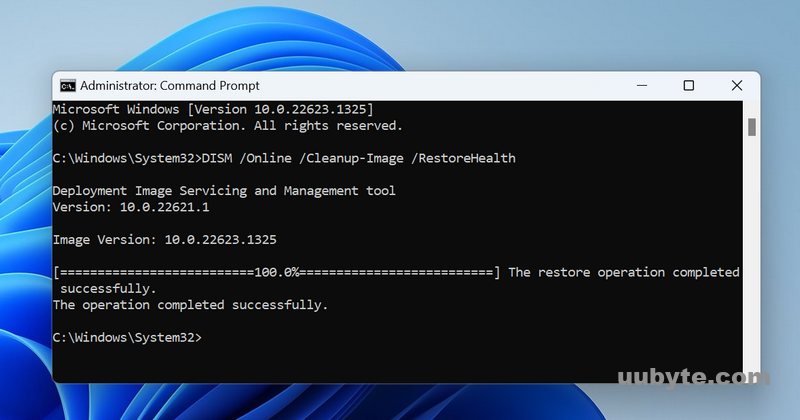
Step 3: In the Command Prompt window, type the following command and press Enter:
DISM /Online /Cleanup-Image /RestoreHealth
Step 4: The tool will scan your system for any corrupted or damaged system files and will attempt to repair them.
Step 5: Next, run "sfc /scannow" to scan for and repair corrupt or damaged system files. It stands for System File Checker and is used to verify the integrity of system files on your computer. It is a useful tool for troubleshooting Windows 11 issues such as system crashes, slow performance, or other issues.
sfc /scannow
Step 6: Once the scan and repair process is complete, restart the computer to flush the changes.
The RestoreHealth command is a powerful tool that can help fix many Windows 11 issues caused by corrupt or damaged system files. However, it may not be able to fix all issues and may require additional troubleshooting or repair steps. It’s also important to note that running the RestoreHealth command can take some time, so it’s best to be patient and let the tool complete its process.
2. Disable Auto Start Program at Login

Auto start programs are programs that are set to start automatically when Windows starts up. These programs can slow down your computer’s boot time and may also use system resources in the background, which can impact overall performance. Some common examples of auto start programs include antivirus software, messaging apps, and cloud storage clients.
Auto start programs can slow down your computer’s boot time as they load in the background. To disable auto start programs, follow these steps:
Step 1: Open the Task Manager by pressing Ctrl + Shift + Esc.
Step 2: Click on the "Startup" tab.
Step 3: Here you will see a list of programs that start with Windows. You can select the program you want to disable and click on "Disable" at the bottom right corner of the screen.
Step 4: If you’re not sure which program is causing issues, you can try disabling them one at a time until you find the culprit.
Step 5: Once you have disabled the programs you don’t need, you can restart your computer to see if the boot time has improved.
Alternatively, you can use third-party software like CCleaner or Autoruns to manage auto start programs. These programs give you more control over what programs start with Windows and can help you disable them more easily.
3. Keep Windows 11 Update to Date
Windows 11 updates are software updates provided by Microsoft for the Windows 11 operating system. These updates are designed to improve the performance, security, and functionality of your computer. Windows 11 updates can include bug fixes, security patches, and new features that enhance your computing experience.
Installing Windows 11 updates can sometimes help decrease booting time. Windows updates often include performance improvements and bug fixes that can help optimize your computer’s performance. Here’s how to install Windows 11 updates:
Step 1: Go to Settings by clicking on the Start menu and then clicking on the gear icon.
Step 2: Click on "Windows Update" in the left-hand menu.
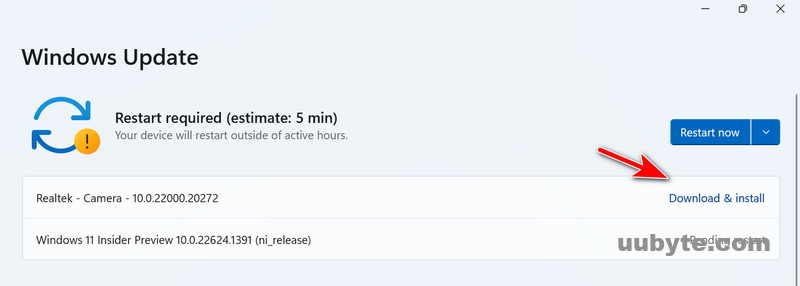
Step 3: Click on "Check for updates" to see if there are any updates available for your computer.
Step 4: If there are updates available, click on "Download and install" to begin the installation process.
Step 5: Once the updates are downloaded, you will need to restart your computer to complete the installation process.
Step 4:After the restart, Windows will install the updates and configure your system settings. You should notice some improvements in your computer’s performance, including faster boot times.
It’s important to keep your computer up to date with the latest Windows updates to ensure optimal performance and security. Windows updates can also include new features and improvements, so it’s a good idea to check for updates regularly.
4. Delete Uninstalled Applications

Deleting uninstalled applications can sometimes help reduce booting time as it frees up space on your computer’s hard drive and removes any unnecessary files that may be slowing down your system. Here’s how to delete uninstalled applications:
Step 1: Open the Control Panel by searching for it in the Start menu.
Step 2: Click on "Programs and Features."
Step 3: Here you will see a list of all the applications installed on your computer.
Step 4: Look for any applications that are no longer needed or have already been uninstalled.
Step 5: Select the program you want to remove and click on "Uninstall."
Step 6: Follow the prompts to complete the uninstallation process.
Step 7: Repeat this process for any other uninstalled applications.
Deleting uninstalled applications can help free up disk space and reduce the amount of time it takes for your computer to boot up. It’s a good idea to regularly clean up your computer and remove any files or applications that are no longer needed to keep your system running smoothly and efficiently.
5. Remove Junk Files from Windows 11
Junk files in Windows 11 are temporary files, cache files, and other unnecessary files that accumulate over time as you use your computer. These files can take up valuable space on your hard drive and slow down your computer’s performance.
Removing junk files from Windows 11 can help make your computer run faster by freeing up space on your hard drive and improving system performance. Here’s how to remove junk files from Windows 11:
Step 1: Open the Settings app by clicking on the Start menu and then clicking on the gear icon.
Step 2: Click on "System" in the left-hand menu.
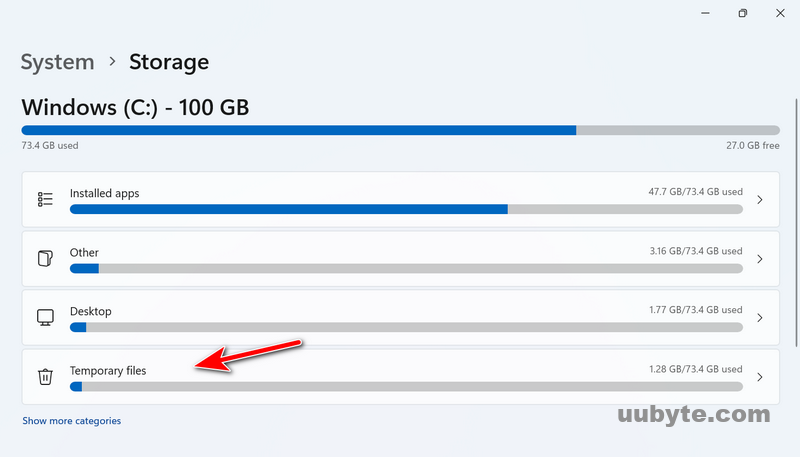
Step 3: Click on "Storage" in the left-hand menu.
Step 4: Here you will see a breakdown of how your storage is being used.
Step 5: Click on "Temporary files" to see a list of files that can be safely deleted.
Step 6: Select the types of files you want to remove, such as temporary files, system files, and recycle bin files.
Step 7: Click on "Remove files" to delete the selected files.
6. Check for Virus and Malware
Malware or viruses can definitely slow down the booting time of your computer as they can consume system resources and interfere with the startup process. Malware can also modify or damage critical system files, causing your computer to take longer to boot up or even crash.
To remove malware or virus from your computer, follow these steps:
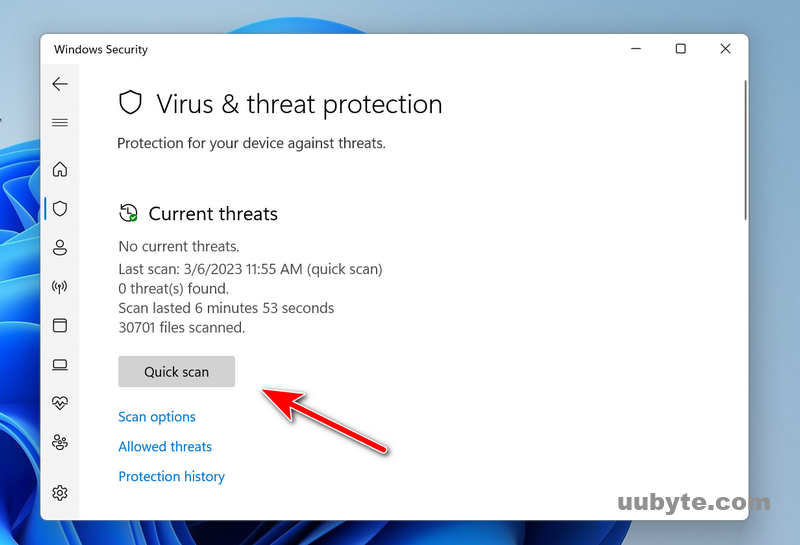
Step 1: Use an antivirus program to scan your computer and detect any malware or viruses that may be present. If you don’t have an antivirus program, you can download and install one such as Windows Defender or Avast.
Step 2: Once the antivirus scan is complete, follow the prompts to remove any detected malware or viruses.
Step 3: If the antivirus program is unable to remove the malware or virus, you may need to use a specialized malware removal tool such as Malwarebytes or Spybot Search and Destroy.
Step 4: Once the malware or virus is removed, it’s important to reset your browser settings to remove any unwanted toolbars or extensions that may have been installed.
Step 5: To prevent future malware infections, make sure to keep your antivirus software up to date and avoid downloading or opening suspicious email attachments or links.
Removing malware or virus from your computer can help improve its performance and make it run faster. If you suspect that your computer is infected with malware, it’s important to take action as soon as possible to prevent further damage and ensure the security of your personal data.
7. Factory Reset Windows 11
A factory reset is a process that restores your Windows 11 computer to its original factory settings. This means that all your personal data, files, and installed applications will be deleted and your computer will be restored to its original state when you first purchased it. A factory reset can help fix slow booting Windows 11 PC as it removes any unnecessary files and programs that may be causing your system to slow down.
Here’s how to use factory reset to fix slow booting Windows 11 PC:
Step 1: Click on the Start menu and then click on the gear icon to open the Settings app.
Step 2: Click on "System" in the left-hand menu.
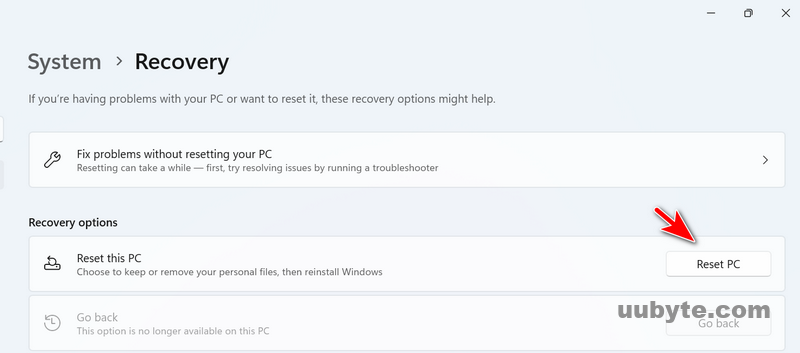
Step 3: Click on "Recovery" in the left-hand menu.
Step 4: Under "Reset this PC," click on "Get started."
Step 5: Choose whether you want to keep your personal files or remove everything.
Step 6: If you choose to remove everything, click on "Just remove my files" or "Remove files and clean the drive" if you want to securely erase your data.
Step 7: Follow the prompts to complete the factory reset process.
Note: Before doing a factory reset, it’s important to back up any important files or data as they will be deleted during the process.
A factory reset can help fix slow booting Windows 11 PC, but it should be used as a last resort as it will delete all your personal files and applications. If you’re experiencing slow booting, try other methods such as removing unnecessary programs, cleaning up junk files, or updating your drivers before doing a factory reset.
Video Tutorial: How to FIX SLOW BOOT TIMES in Windows 11