Table of Contents
Automatic login, also known as auto sign-in, is a convenient feature that allows you to bypass the login screen when starting your Windows 11 computer. However, sometimes this feature may not work as expected, leading to users having to enter their credentials each time they start their computer. This blog post will guide you through the process of troubleshooting and fixing the automatic login issues in Windows 11.
How Does Automatic Login Work on Windows 11?
Instead of entering a username and password, the user is automatically logged in to their account upon startup when auto login is enabled on Windows 11. This feature provides a seamless experience, especially for users who are the sole occupants of their computers.
Here’s how automatic login works on Windows 11:
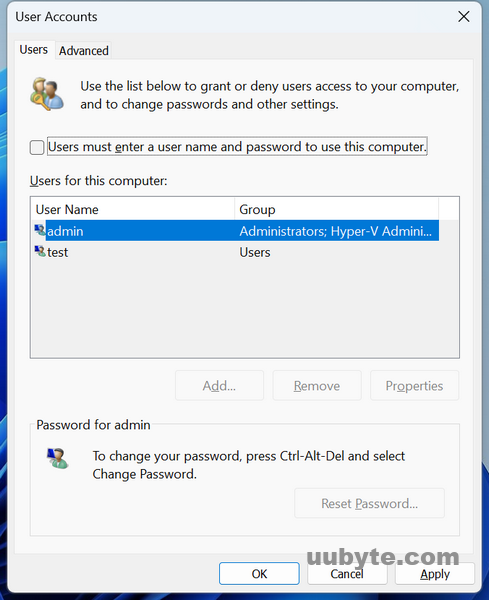
- A user enables the automatic login feature by configuring the settings in the User Accounts window (using the
netplwizcommand). - When the user unchecks the "Users must enter a user name and password to use this computer" option and applies the changes, they’ll be prompted to enter their password to confirm the change.
- Once the automatic login feature is enabled, Windows 11 stores the user’s password in an encrypted form in the registry. This stored password is used to automatically log in the user when the computer starts.
- During the startup process, Windows 11 reads the encrypted password from the registry, decrypts it, and uses it to authenticate the user, logging them in without displaying the login screen.
While automatic login provides convenience, it can pose security risks. Anyone with physical access to the computer can access the user’s files and data without needing to enter a password. It’s essential to consider the security implications before enabling automatic login, especially on shared computers or in public spaces.
How to Enable Automatic Login in Windows 11
Enabling automatic login in Windows 11 allows you to bypass the login screen when starting your computer, logging you in directly to your user account. To enable this feature, follow these steps:
- Press the Windows key + R to open the Run dialog box.
- Type
netplwizand press Enter to open the User Accounts window. - In the User Accounts window, select the user account for which you want to enable automatic login.
- Uncheck the box labeled "Users must enter a user name and password to use this computer" and click "Apply."
- A dialog box named "Automatically sign in" will appear. Enter your password twice in the provided fields and click "OK."
- Click "OK" in the User Accounts window to save your settings.
- Restart your computer to test if the automatic login feature is working as expected.
Keep in mind that enabling automatic login can pose security risks, as anyone with physical access to your computer can access your files and data without entering a password. Be sure to weigh the convenience against potential security risks before enabling this feature, particularly on shared computers or in public spaces.
How to Fix Windows 11 Not Signing in Automatically
Solution 1: Reconfigure Automatic Login Settings
- Press the Windows key + R to open the Run dialog box.
- Type
netplwizand press Enter to open the User Accounts window. - In the User Accounts window, select the user account for which you want to enable automatic login.
- Uncheck the box labeled "Users must enter a user name and password to use this computer" and click "Apply."
- Enter your password twice in the "Automatically sign in" dialog box and click "OK."
- Restart your computer to test if automatic login is working.
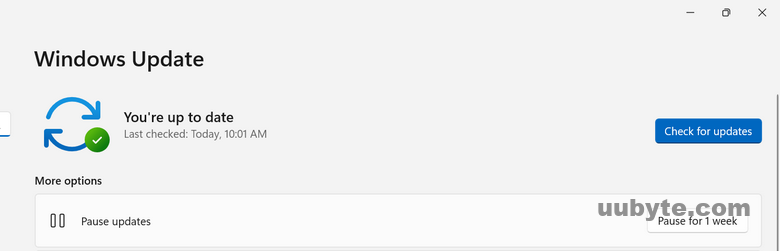
Solution 2: Check for Windows Updates
Ensure your Windows 11 system is up-to-date by installing the latest updates. Sometimes, the automatic login issue may be caused by bugs that are fixed in newer updates.
- Press the Windows key + I to open the Settings app.
- Click on "Windows Update" in the left sidebar.
- Click on "Check for updates" and install any available updates.
- Restart your computer and check if the automatic login issue is resolved.
Solution 3: Perform a Clean Boot
A clean boot can help identify if third-party software is causing conflicts with the automatic login feature.
- Press the Windows key + R to open the Run dialog box.
- Type
msconfigand press Enter to open the System Configuration window. - In the System Configuration window, click on the "Services" tab.
- Check the box labeled "Hide all Microsoft services" and click "Disable all."
- Click on the "Startup" tab and then click on "Open Task Manager."
- In Task Manager, disable all startup items by right-clicking on each item and selecting "Disable."
- Restart your computer and test if the automatic login issue is resolved.
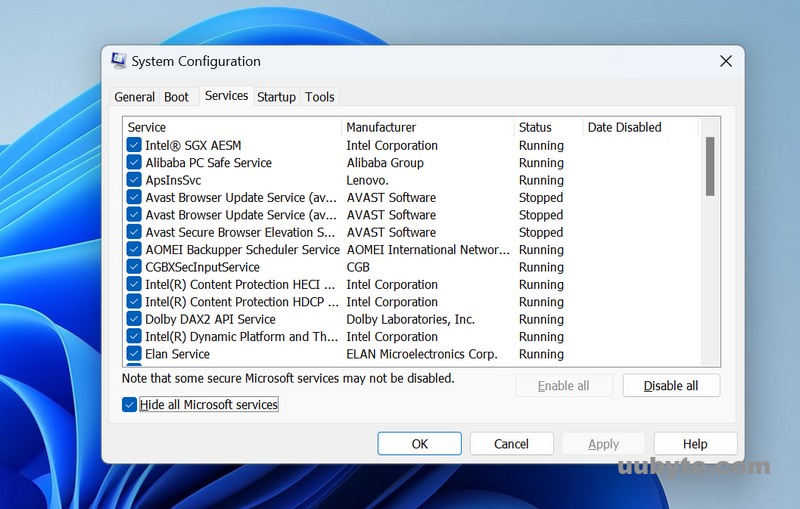
If the issue is resolved, you can enable startup items and services one by one to identify the conflicting software.
Frequently Asked Questions
Is it safe to enable automatic login on my Windows 11 computer?
While automatic login is convenient, it can pose security risks, as anyone with physical access to your computer can access your files and data without entering a password. It’s best to weigh the convenience against the potential security risks before enabling automatic login.
Can I enable automatic login for multiple user accounts on the same computer?
No, automatic login can only be enabled for one user account at a time on a single computer.
Does enabling automatic login affect the password protection for my user account?
Enabling automatic login does not remove the password for your user account. Your account will still be password-protected when switching users or accessing it remotely.
Video: How to Enable or Disable Automatically Sign In Account at Startup in Windows 11
Can’t Login Windows 11? Reset Password with PassMoz LabWin
If you can’t log in to your Windows 11 computer because you’ve forgotten your password, using a third-party tool like PassMoz LabWin can help you reset the password and regain access to your account. PassMoz LabWin is a reliable and easy-to-use Windows password recovery tool that can reset local and Microsoft account passwords without requiring you to reinstall the operating system or lose any data.
Here’s how to use PassMoz LabWin to reset or change Windows 11 password:
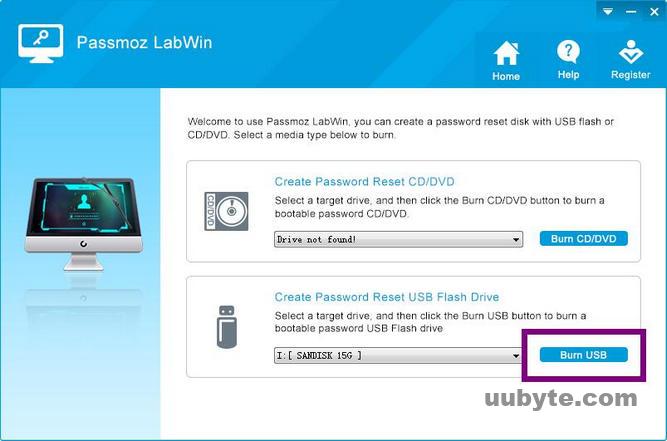
Step 1: Create a bootable password reset disk
- Download PassMoz LabWin on a different, accessible computer.
- Install and launch the software.
- Insert a blank USB flash drive or a writable CD/DVD into the computer.
- Select the appropriate media type (USB or CD/DVD) in PassMoz LabWin.
- Click "Burn" to create a bootable password reset disk.
Step 2: Boot your locked Windows 11 computer from the password reset disk
- Insert the bootable password reset disk (USB or CD/DVD) into the locked Windows 11 computer.
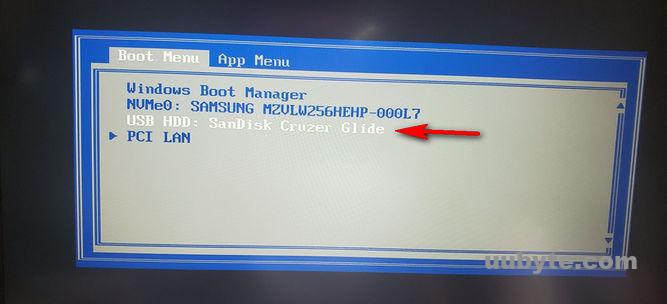
- Restart the computer and immediately press the appropriate key (usually F2, F10, F12, ESC, or DEL) to enter the BIOS or UEFI settings.
- In the BIOS/UEFI settings, navigate to the "Boot" tab and set the boot priority to boot from the inserted USB or CD/DVD.
- Save the settings and exit the BIOS/UEFI. Your computer will restart and boot from the password reset disk.
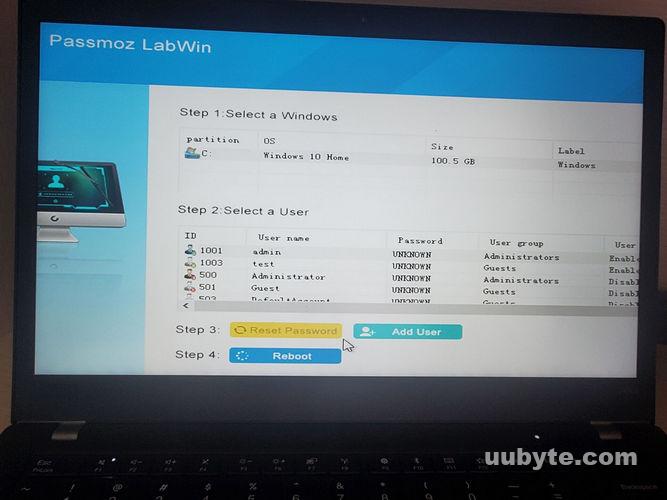
Step 3: Reset your Windows 11 password with PassMoz LabWin
- When the PassMoz LabWin interface appears, select the Windows installation (usually "Windows 11") and the user account whose password you want to reset.
- Click "Reset Password" to remove the existing password.
- Click "Reboot" to restart your computer. Remove the password reset disk before the computer starts.
- You can now log in to your Windows 11 account without a password.
After regaining access to your account, it’s recommended to create a new, strong password to ensure the security of your files and data. Additionally, consider setting up password hints or using a password manager to avoid forgetting your password in the future.
Summary
In conclusion, automatic login issues in Windows 11 can be resolved using various troubleshooting methods, such as reconfiguring automatic login settings, updating Windows, or performing a clean boot. By following these solutions, you can quickly regain the convenience of automatic login and save time when starting your computer.