Table of Contents
Your Mac will run very slow and bring up a lot of troubles if the disk space is in short. This is a common issue on budget Macs with only 125 GB SSD. You have to clean up the disk space on your Mac to make it performing well without lagging.
We will share the most important tips you can take advantage of to free up more disk space on a Mac. Our machine is M1 MacBook Air running the latest macOS Ventura. In addition, the tricks also work well on old Macs. Please don’t worry!
Why Does My Mac Help Saying Not Enough Disk Space?
One of the most common and frustrating issues that Mac users experience is a message saying “not enough disk space”. This error message usually appears when you try to install an application, save a file, or perform some other disk-intensive operation and there isn’t enough space left on your hard drive.
The main cause of this issue is the lack of available disk space. Your Mac’s hard drive has a finite capacity, and when it is full, it can’t accommodate any more data. You can solve this issue by freeing up disk space on your Mac.
How Much Disk Space a Mac Have?
Disk space is an important factor to consider when purchasing a Mac. Macs come with a variety of disk space options, ranging from 128GB to 4TB. The amount of disk space you need will depend on your usage and the type of files you store. For entry level Mac, it usually comes with a small SSD by default (128 or 256 GB). This is far from enough in nowadays.
For the average user, 512GB of disk space should be more than enough. This should provide enough space to store photos, music, documents, and other files. If you plan on storing large media files, such as videos or high-resolution photos, then you may want to consider a higher capacity drive.
For power users, such as photographers and video editors, a larger drive may be necessary. Depending on the type of files you store, you may need up to 4TB of disk space. This will provide enough space to store large media files, as well as other documents and software.
How to Check Disk Usage on Mac Ventura
Checking your disk usage on a Mac is an important step in ensuring that your computer is running efficiently and that you have enough storage space for all of your files. Fortunately, Macs make it easy to check your disk usage with just a few clicks. Here’s how to do it:
1. Open the Finder window.
2. Select “About This Mac” from the Apple menu in the top left corner of the screen.
3. Click the “Storage” tab so you can see the brief information about the disk space.
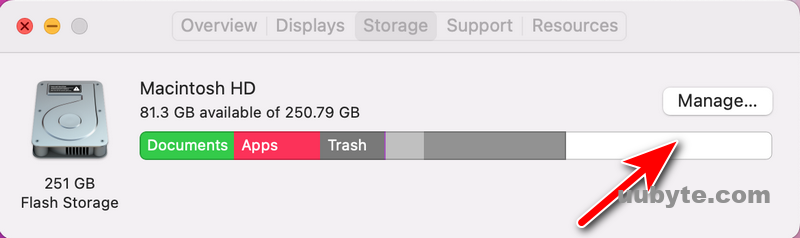
4. To view the details of how disk space is used, please click the “Manage“ button to view a breakdown of the types of files that are taking up the most space. This can be helpful if you want to free up some disk space by deleting unnecessary files.
Why You Need to Clean up Disk Space on Mac Ventura?
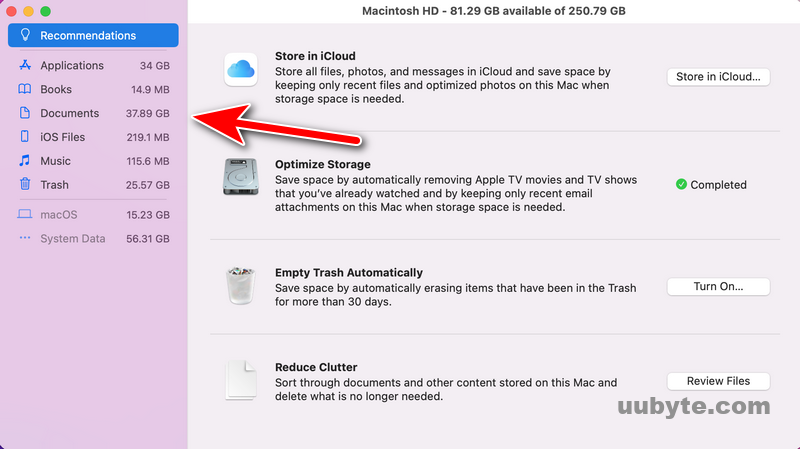
Cleaning disk space on Mac is an important task to keep your computer running smoothly. Over time, your Mac can accumulate a lot of unnecessary files, which can slow down your system and take up valuable storage space. By regularly cleaning up your disk space, you can free up valuable storage space, improve system performance, and keep your Mac running at its best.
The first step in cleaning up your disk space is to identify which files are taking up the most space. To do this, you can use the “About This Mac” feature in the Apple menu. This will show you the amount of storage space used by each category of files, such as applications, documents, music, and photos. You can then decide which files you want to delete or move to an external drive.
Once you’ve identified the files that are taking up the most space, you can start to delete them. You can do this manually by selecting the files and dragging them to the Trash, or you can use a third-party app like CleanMyMac to automate the process. CleanMyMac will scan your Mac for unnecessary files and delete them for you.
Another way to free up disk space is to uninstall applications you no longer use. To do this, open the Applications folder and drag the application you want to uninstall to the Trash. You can also use a third-party app like AppCleaner to uninstall applications and their associated files.
How Do I Clean Up Disk Space on Mac Ventura?
Honestly, it is quite straightforward process to free up disk space on Mac Ventura. There are a number of ways to achieve the task. But the most effective ones are listed in below.
Tips 1: Empty Trash Can
Cleaning up your Mac disk space is an important part of maintaining your computer. One of the easiest ways to do this is to delete the Trash. Doing so can free up a lot of space on your hard drive, allowing you to store more files and programs. Here are the steps for deleting the Trash on your Mac:
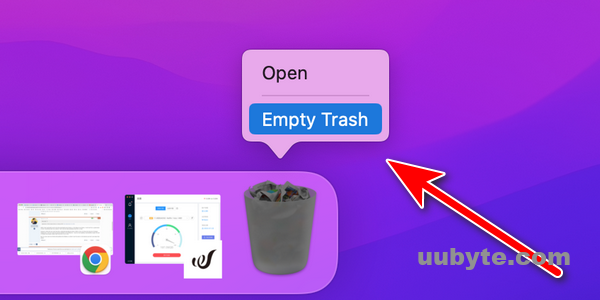
1. Open the Trash folder. You can do this by clicking the Trash icon in the Dock, or by going to Finder > Empty Trash.
2. Select the items you want to delete. You can select individual items or select all items by pressing Command+A.
3. Click the Delete button. This will delete the selected items from your Trash folder.
Tips 2: Delete Apps Less Frequently
Clearing out unused apps is one of the best ways to free up disk space on your Mac. Unused apps take up valuable storage space, and can slow down your Mac’s performance. Fortunately, it’s easy to delete apps you no longer need. Here’s how to do it:
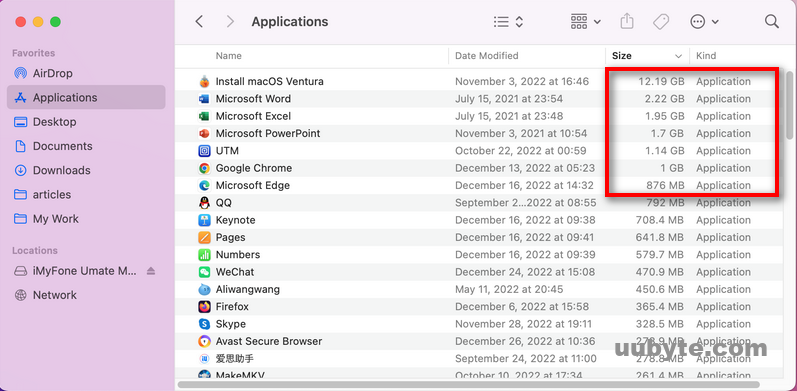
The first step is to identify which apps you no longer need. To do this, open the Finder window and select Applications from the sidebar. This will show you all the apps installed on your Mac. Look through the list and make a note of any apps you don’t use.
Once you’ve identified the apps you don’t need, it’s time to uninstall them. To do this, right-click on the app and select Move to Trash. This will delete the app from your Mac.
The last step is to empty the Trash. To do this, right-click on the Trash icon in the Dock and select Empty Trash. This will permanently delete the apps from your Mac.
Tips 3: Clean up the Download Folder on Mac
Cleaning up your Mac’s disk space can be a daunting task, especially if you have a lot of downloads that have been piling up over time. However, it doesn’t have to be a difficult process. Here are some tips to help you clean up your Mac’s disk space by deleting download files.
The first step in cleaning up your Mac’s disk space is to open the Finder and select the Downloads folder. This folder contains all of the files that you have downloaded from the internet, such as music, videos, and software.
Open Finder app and go to the Downloads folder, you can sort the files by size. This will allow you to easily identify the largest files that are taking up the most disk space.
Once you have identified the files that are taking up the most disk space, you can delete them if you no longer need them. Be sure to check that you are not deleting any important files before you delete them.
Lastly, you should empty the Trash. This will permanently delete the files and free up the disk space that they were taking up.
Tips 4: Clear Cache and Cookies on Mac
Clearing cache and cookies on Mac is an effective way to free up disk space and improve the performance of your Mac. Cache and cookies are temporary files that are stored on your computer when you visit websites. Over time, these files can accumulate and take up valuable disk space. By clearing your cache and cookies, you can free up disk space and improve the performance of your Mac.
Here are the steps to clear your cache and cookies on Mac:
1. Open your web browser.
2. Click on the “Preferences” or “Settings” option.
3. Select the “Privacy” or “Security” tab.
4. Click on the “Clear Cache” or “Clear History” option.
5. Select the “Clear Cookies” option.
6. Confirm your selection.
Tips 5: Delete Temporary Files on Mac
Temporary files are created when applications are running, and can take up a lot of space on your hard drive. Here’s how to delete temporary files on Mac:
Step 1: Open the Finder window.
Step 2: Select “Go” from the top menu bar and then select “Go to Folder”.
Step 3: Type in “~/Library/Caches” and click “Go”.
Step 4: Select the files you want to delete and click “Move to Trash”.
Step 5: Empty the Trash to delete the files permanently.
Tips 6: Move Large File to External Drive
Moving large files to an external drive is a great way to free up space on your computer and keep your data safe. Whether you’re transferring music, photos, videos, or other files, it’s easy to do with the right tools. Here’s how to move large files to an external drive.
Step 1: Choose the Right External Drive
The first step in moving large files to an external drive is to choose the right drive. You’ll want to make sure the drive is compatible with your computer and has enough storage capacity for your files. Consider the size of the files you’re transferring, as well as the speed of the drive. If you’re transferring large files, you’ll want a drive with a fast transfer rate.
Step 2: Connect the External Drive
Once you’ve chosen the right external drive, the next step is to connect it to your computer. Most external drives connect via USB, so you’ll need to make sure your computer has a USB port. Some external drives may require a special cable or adapter, so make sure you have the right equipment.
Step 3: Copy the Files
Now it’s time to copy the files to the external drive. You can do this by dragging and dropping the files from your computer to the external drive. Alternatively, you can use a file transfer program to copy the files. This will ensure the files are transferred correctly and quickly.
Step 4: Disconnect the External Drive
When the files have been transferred, it’s important to disconnect the external drive from your computer. This will help protect your data and prevent any potential problems. To disconnect the drive, simply unplug the USB cable from your computer.
Tips 7: Upload files and folders to Cloud Drive
Uploading files and folders to cloud drives is becoming increasingly popular as a way to store and share data. Cloud drives are online storage services that provide users with a secure and convenient way to store their data. By uploading files and folders to a cloud drive, users can access their data from any device with an internet connection. Steps to Upload Files and Folders to a Cloud Drive:
1. Sign up for a cloud drive service. Popular cloud drive services include Google Drive, Dropbox, and Microsoft OneDrive.
2. Download the cloud drive software to your computer.
3. Log in to the cloud drive service.
4. Select the files and folders you want to upload.
5. Click the “Upload” button.
6. Wait for the upload to complete.
Recommended: 1-Click Solution to Free Space on Mac Ventura
Data cleaning is an essential step in maintaining a healthy Mac. By using a data cleaning app, you can free up space on your Mac and make it run more efficiently. Here are some of the benefits of using a data cleaning app to free up space on your Mac:
1. Increased Performance: By removing unnecessary files, a data cleaning app can help your Mac run faster and more efficiently. This is especially true for older Macs that may be bogged down with too many files.
2. Improved Security: Data cleaning apps can help you remove malicious files that can slow down your Mac and put your personal information at risk.
3. More Space: By removing unnecessary files, you can free up space on your Mac, allowing it to run more efficiently and giving you more storage space.
4. Easier Maintenance: Data cleaning apps can help you keep your Mac clean and organized, making it easier to maintain and troubleshoot.
In here, our example is iMyFone Umate Mac Cleaner!
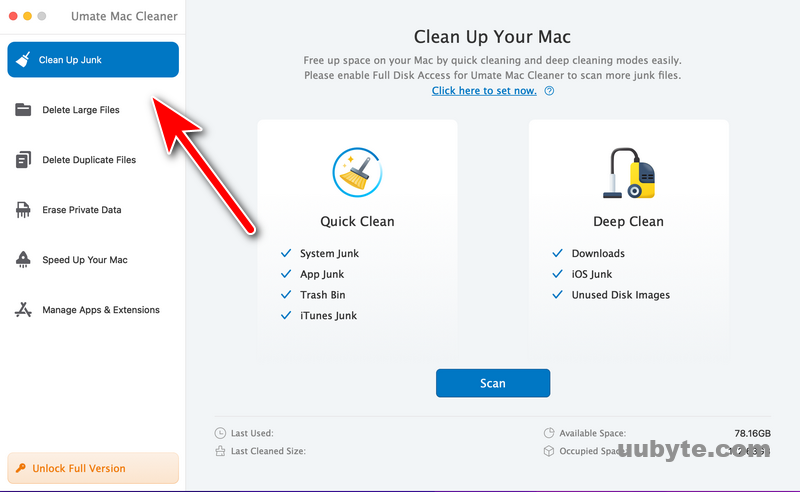
iMyfone Umate Mac Cleaner is a great tool for Mac users who want to free up valuable storage space and keep their Macs running smoothly. It can help users delete large and old files, clear caches, erase data, and more. It also offers users the ability to customize their cleaning preferences, so they can choose which files and folders to delete and which to keep.
The software is easy to use and comes with an intuitive user interface. It also provides users with detailed information about their Macs, such as the amount of storage space available and the types of files that are taking up the most space. This makes it easy to identify which files and folders to delete and which to keep.
The software also offers users the ability to securely delete files and folders. This ensures that deleted files and folders cannot be recovered, which is important for users who want to ensure their data is secure.
Video Tutorial: How to Free Up Disk Space on Your Mac! (2023)
According to the suggestions listed above, you can find it is super easy to clean up Mac disk space even on the latest macOS Ventura. However, most of the tricks do take some time and effort as you have to do it manually. In fact, we more recommend using a data cleaner app to do this task automatically. However, this is totally up to you!